Weaving provides me with many opportunities for continuous growth—as an artist, as a weaver, and sometimes even as a math whiz (depending on how my planning is going). After learning to read drafts and weaving a variety of structures, I decided that my next step forward was to design drafts of my own.
I was looking for a single threading that I could use in multiple ways, and for a structure where I didn’t need to plan out everything in advance. That’s when I stumbled upon rosepath and the beautiful borders it could help me weave.
What is Rosepath?
Rosepath is a point twill threading that extends one thread beyond the number of available shafts—on my 8-shaft loom, that means a threading unit of 1-2-3-4-5-6-7-8-1-8-7-6-5-4-3-2-1. A loom threaded in rosepath can weave many kinds of twill patterns, as well as a world of border motifs.
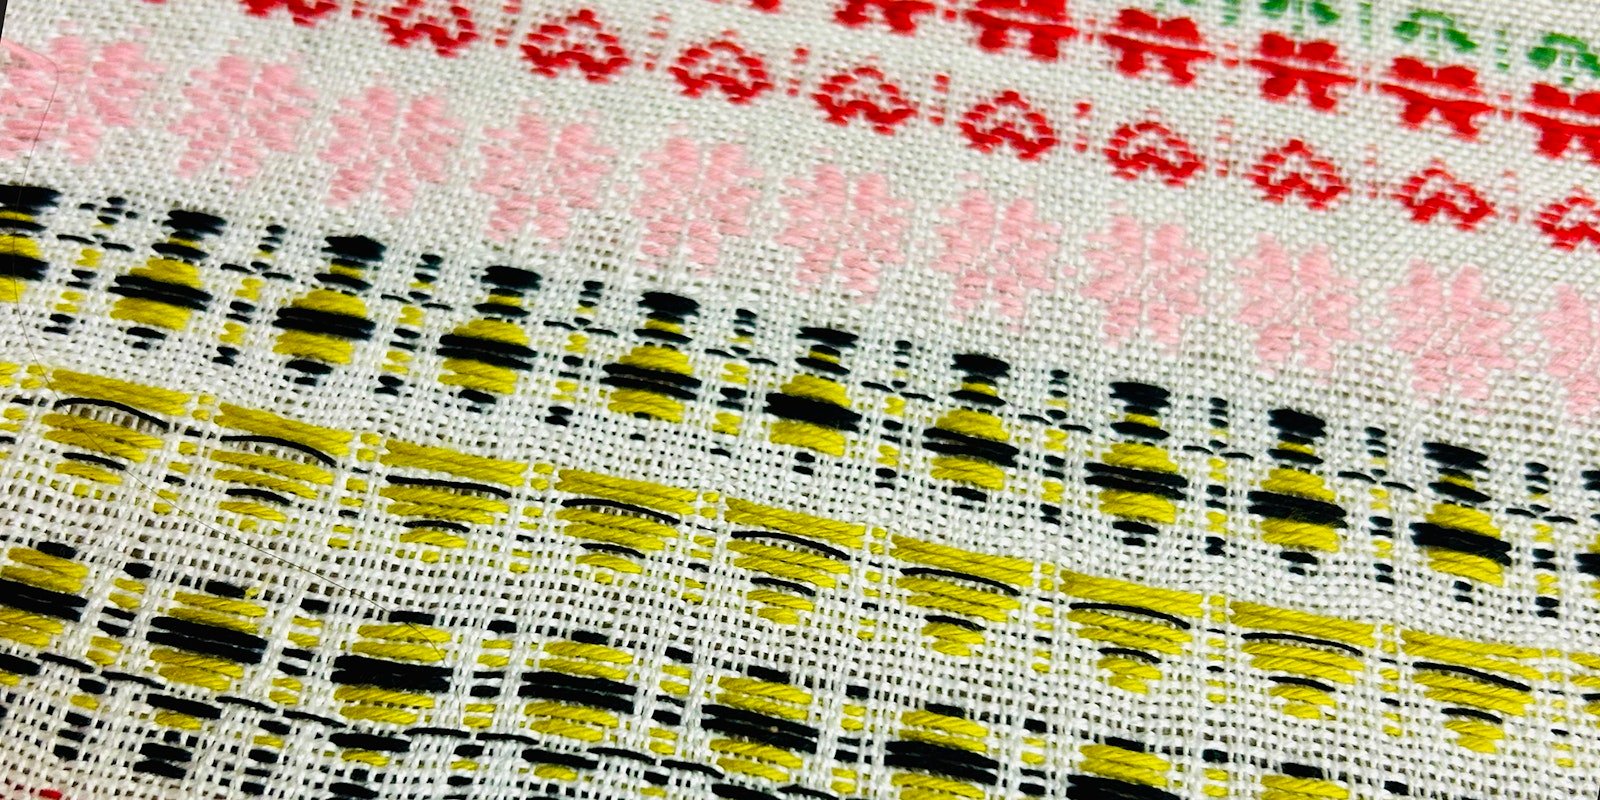
In border motifs, picks of pattern weft floating across the warp produce rows of hearts, flowers, animals, letters, trees, or so many other shapes. Those motifs are symmetrically shaped across the threading’s central warp end. A tabby weft pick between each pattern row keeps the fabric stable, while variations in tie-up and treadling make all the different motifs possible.
Yarn used for pattern weft is generally colorful; it can be the same weight as in the ground cloth, while heavier yarns or those with texture or a bit of shine can add something extra to the right motifs.
A single border row can dress up the beginning of a towel, or rows of shapes can be combined for more widespread patterning (the tie-up and treadling will need to change for different motifs, but that’s not hard to do). Because of the pattern floats, fabrics woven with rosepath borders have distinct front and back sides.
How big are border motifs? That depends—the woven size depends both on the tabby picks per inch of the fiber you’re weaving with, and on the length of the treadling sequence required to weave the shape.
You’ll find several dozen border motifs based on rosepath threading on pages 30–33 of A Weaver’s Book of 8-Shaft Patterns, edited by Carol Strickler (Ft. Collins, CO: Interweave, 1991).
Or you can follow my lead—get out some graph paper and design your own custom motif!
Designing a Rosepath Motif
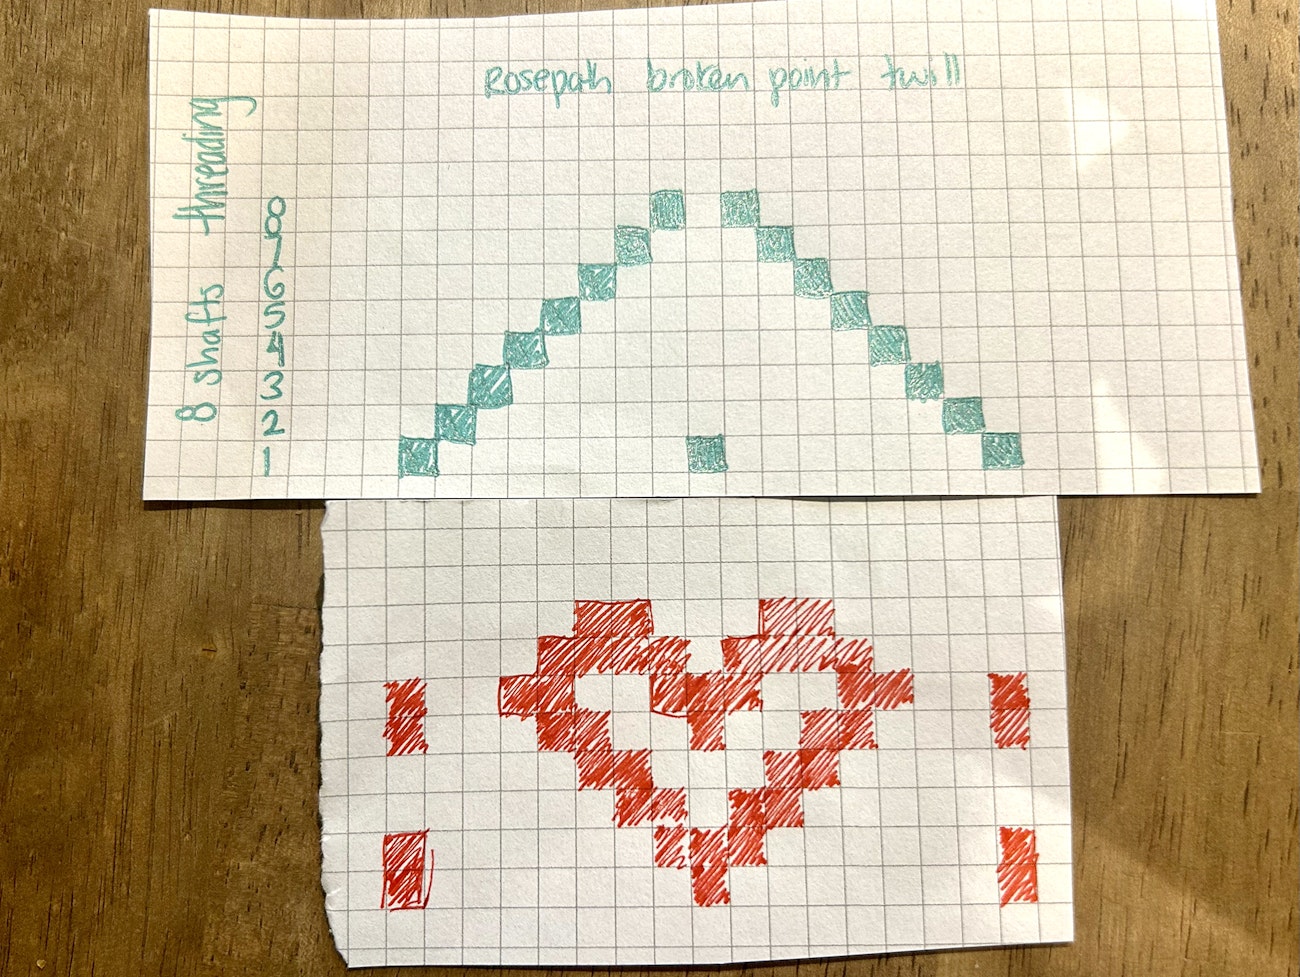
Andrea drew a full rosepath point twill threading for her 8-shaft loom (in green), and then created a heart motif (in red).
Here’s how I do it. I draw a single full repeat of my point twill threading at the top of a piece of graph paper. Then I add a simple symmetrical shape underneath, centered under the central threading end. The motif can be narrower than the threading, but it can’t be wider. In the threading, each vertical row on the graph paper represents a warp end, and each horizontal row represents a shaft. In the motif, each horizontal row represents a weft pick.
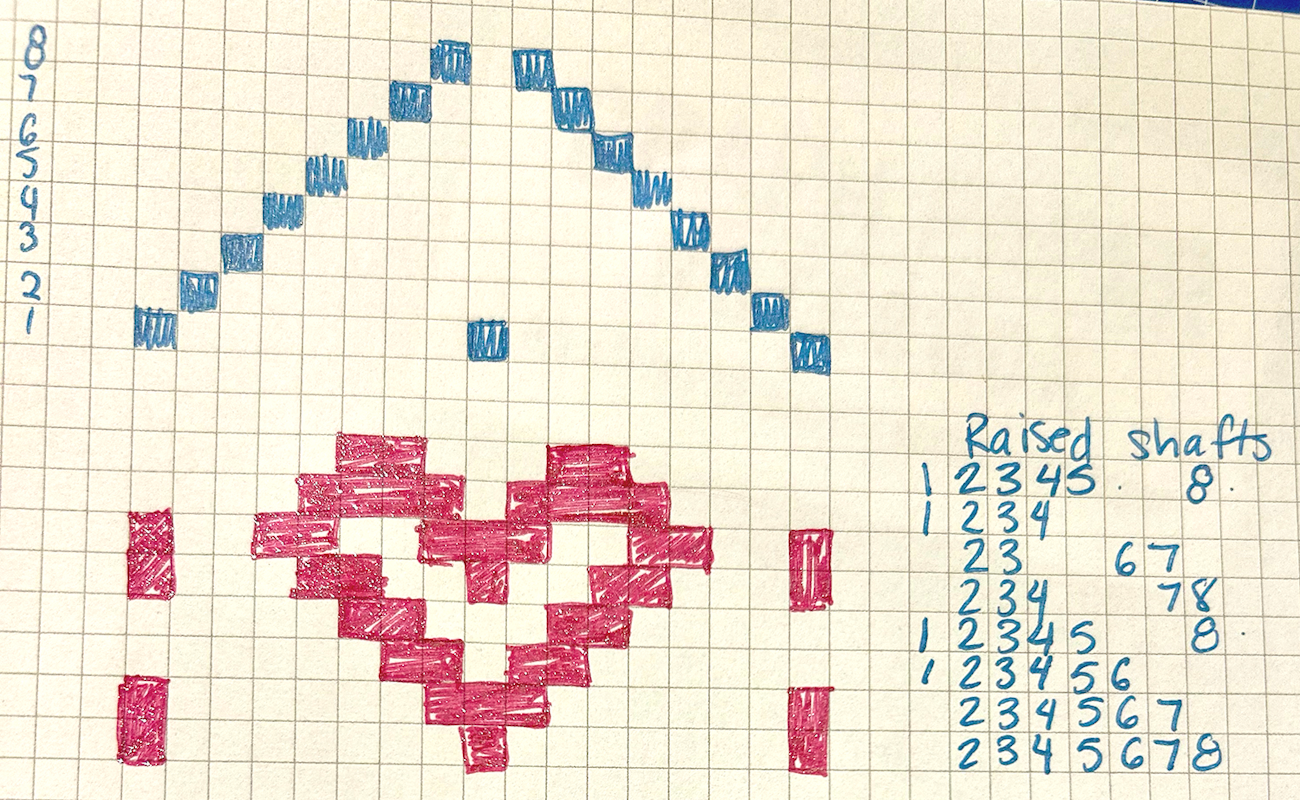
To the right of the motif, Andrea lists the shafts that need to be lifted for each pattern weft pick.
Now the fun starts! Off to the side of the motif, I list every shaft that needs to be raised for each pick (i.e., every square that isn’t colored). As you can see in this heart design, all shafts for red squares stay down during each pick.
This particular motif is 8 picks tall and uses 7 treadles (plus 2 for tabby). With 10 treadles on my loom, I’m good to go. I plan my warp (it’ll be wide enough for several dozen border motifs, and I’ll make it long enough to do some sampling) and draw my tie-up. My final step on graph paper is to make sure I have a clear and doable plan for treadling, especially if I need to step on more than one treadle at a time.
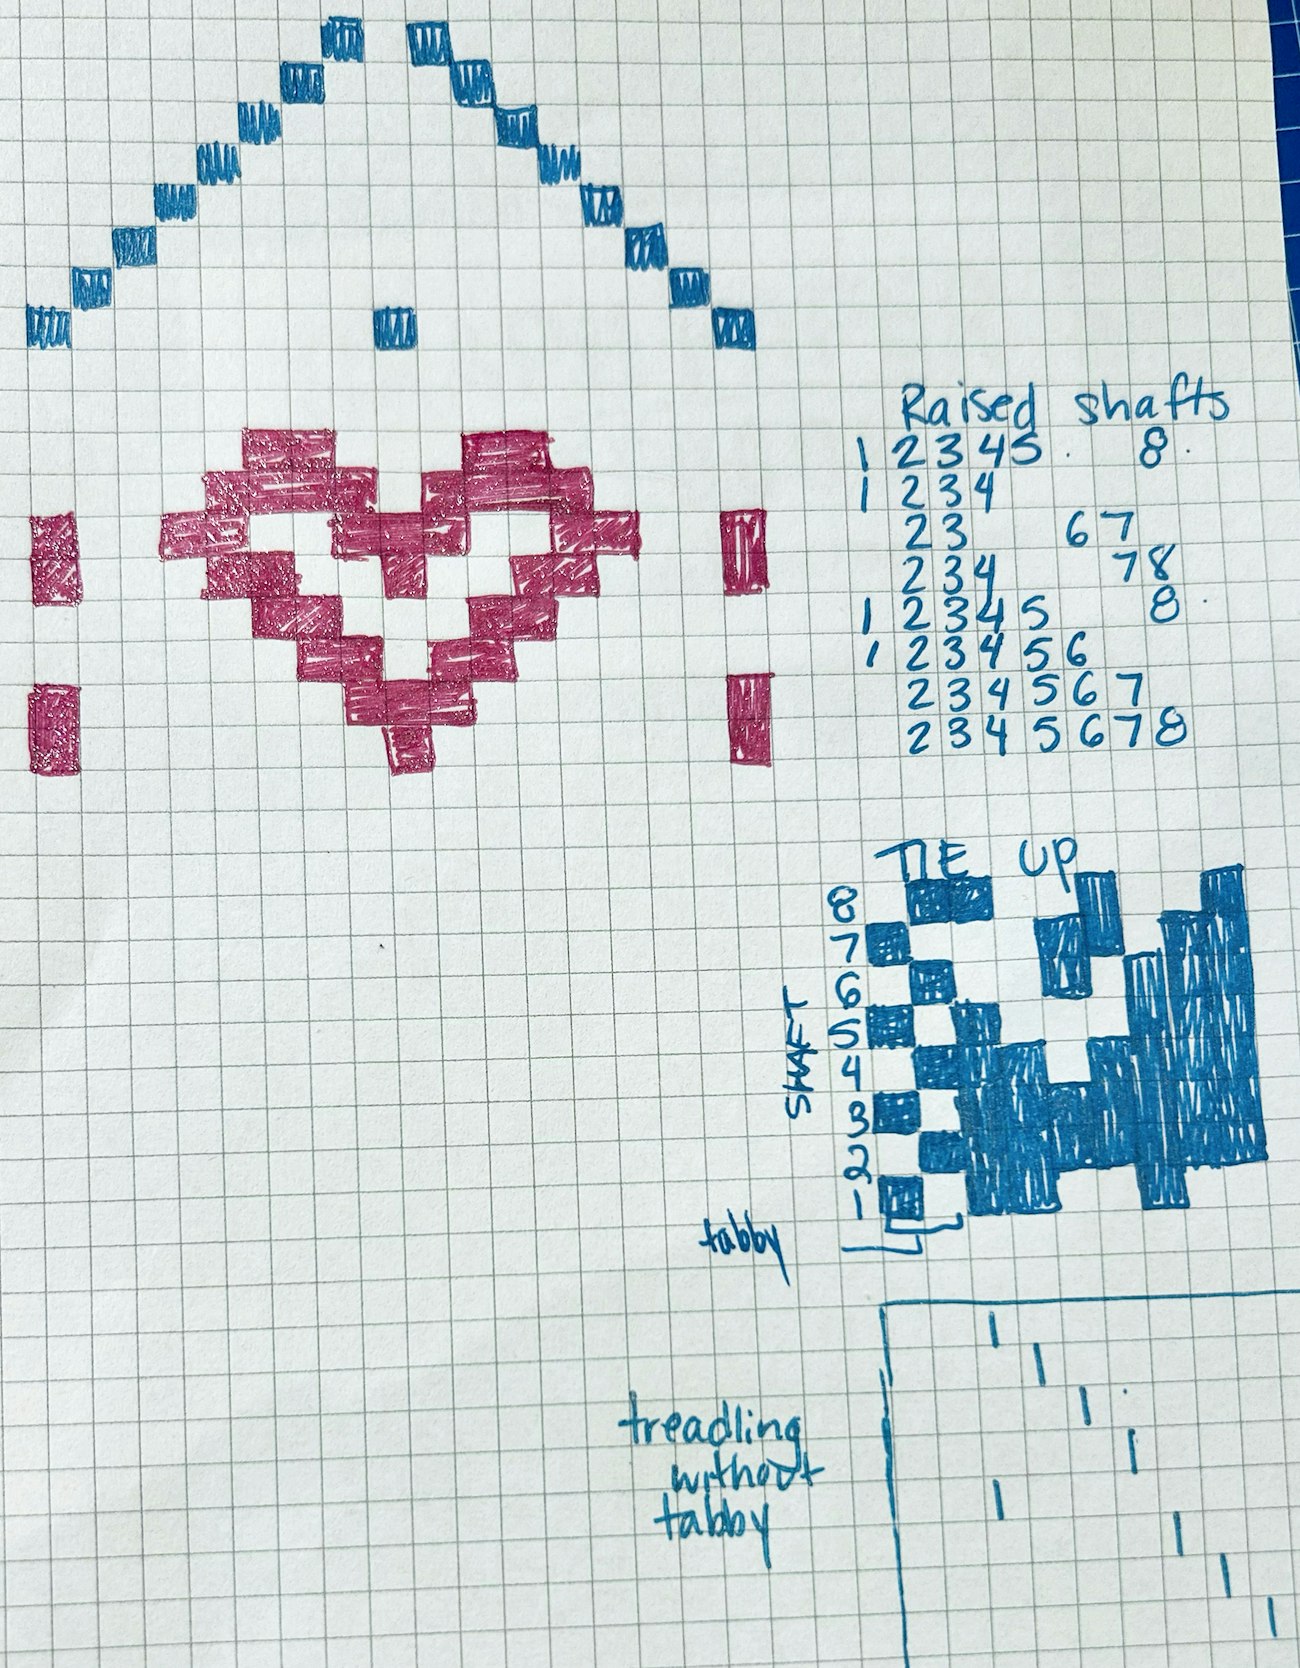
Andrea uses the lifted shafts to determine the tie-up (don’t forget tabby treadles!) and treadling.
If you don’t have enough treadles for your draft, use Tim’s Treadle Reducer to create a skeleton tie-up. (A skeleton tie-up means you’ll need to use both feet for treadling at once—learn more about them in this article.)
Before we move on to weaving, a quick note about the space between border motifs: Because the rosepath threading repeat includes shaft 1 in three places (at the beginning, the center, and the end), shapes that include red squares on the center line will also have red squares on the outer edges, resulting in dots or lines between the motifs. You can design your shape leaving a white square or two on each side to set it off, as my heart motif does, or you can incorporate those dots or lines into your design. The border motifs in Strickler include examples of both approaches.
Time to Weave
We’ll skip over winding your warp and dressing your loom, and get right to the good stuff—weaving your border, and (my favorite part!) suggestions for improvising with it.
After you spread your warp and check for threading errors, you should weave a full motif using pattern weft and then take a moment to review it. If it’s not looking quite right, check your tie-up and treadling to make sure that the right shafts are raised for each pick.
When your motif is looking good it’s time to experiment! As you weave, consider some opportunities to improvise—they are endless:
• Should you use your warp or tabby yarn for your pattern weft? Give it a try!
• Each pattern weft pick can use only one color, but the full motif can use multiple weft colors. How would yours look if you varied the colors in different parts of it?
• What if you strategically added an extra tabby pick or two within your motif (e.g., between a blossom and the top of a stem, or between a head and a body)?
• If a motif isn’t popping, consider using a thicker pattern weft.
• Or should you swap in a fluffy bouclé (for flower petals, or for snow), or a metallic (for a shiny accent)?
• What if you wove your motif upside-down—from the last treadling pick to the first?
Of course, to fully grasp how well any of these experiments work, you’ll need to weave a full motif of each, and then cut off your sample and give it a wet finish. This takes extra effort, but what you’ll learn makes it worthwhile—and your final project will benefit.
Whenever I sit at my rosepath-threaded loom, all I can see is opportunity! There are so many options and stories to tell on my loom, and I can’t wait to see the border designs you come up with on yours!
Andrea is a weaver, spinner, and fiber artist based in DC. She is thrilled to share her love for the area by focusing on wool and native dye plants from her fibershed. You can find her work in magazines like Spin Off, Easy Weaving with Little Looms, and Ply. Find her on Instagram @craftondeck.
• Learn more about designing rosepath in the September/October 1990 issue of Handwoven.
• See other border motifs that use a variety of techniques, including rosepath.