In weaving, there is always something new to learn, a fact that continually brings me joy. It may involve learning a challenging new weave structure or technique, or working with a new-to-me fiber. Sometimes, though, it’s discovering a relatively simple idea that makes a big difference. For example, I learned an inlay technique that allows me to add areas of pattern to a plain-weave background with little advance preparation. It’s a technique that any weaver with four or more shafts can use.
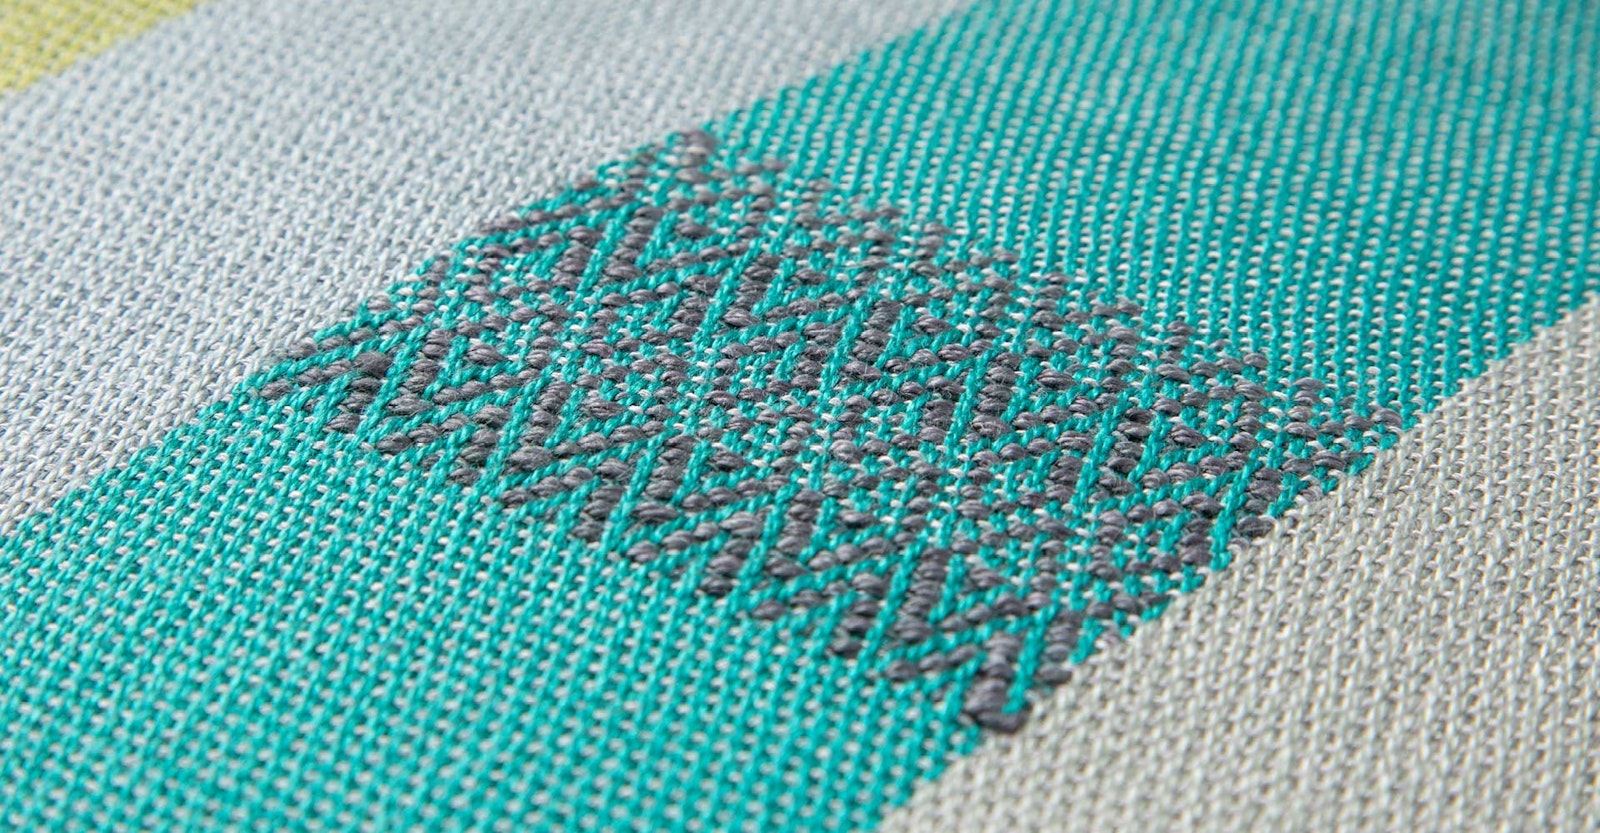
Patterned inlay is similar to overshot, with alternating plain-weave and pattern picks. However, instead of the pattern weft traveling from selvedge to selvedge as in overshot, the inlay appears only where the weaver chooses to place it. A stick shuttle carries the pattern weft through the shed for a short distance, and the weft is gently beaten in. A pick of plain weave that goes from selvedge to selvedge is woven before the next pattern pick. The inlay areas may be whatever size or shape the weaver desires.
My sister Marilyn shared this inlay method with me. She knows that I enjoy trying new techniques and sent me a link to a video produced by Pipyr Dooley (see Resources). In the video, Dooley demonstrates how to add these patterned areas to her weaving. I was intrigued and soon put on a warp to start experimenting. The method is not particularly difficult, but there is definitely a learning curve. Rather than make other weavers work this out on their own, I want to share what I discovered during my sampling and subsequent projects. You’ll probably learn even more as you try it. Experimentation is key.
While patterned inlay can be woven on four shafts, more intricate inlay patterns are possible with more shafts. The technique is suitable for wearables such as scarves and shawls as well as for home décor items. The weaving is reversible, although the two sides may not be identical. A 2/2 twill pattern will look the same on both sides, while other twills and overshot patterns may show a reverse pattern on the back.
Sample patterns, sett, and fiber types
Even if you don’t usually weave samples, it’s a good idea before trying this technique in a full project. Sampling will help you determine the appropriate fiber, yarn size, and pattern for the inlay areas. Choose a warp that’s smooth and fairly fine and sett it slightly wider than usual in the reed. The plain-weave weft should be slightly finer than the warp. Choose a pattern weft the same or slightly thicker than the warp. Avoid textured or multicolored yarns as they may interfere with the pattern’s clarity. If you don’t enjoy warping for samples, try putting on a longer warp than needed and use the first few inches to practice the technique.
Choose the pattern for your inlay areas carefully. Any twill or overshot threading will work as long as the draft allows you to also weave plain weave. The Handweaver’s Pattern Directory, A Weaver’s Book of 8-Shaft Patterns, and other books of drafts are great sources of twill and overshot drafts for inlay. Pick threading drafts with fairly short repeats. Using large overshot patterns with long pattern repeats may result in only partial motifs being visible in the inlay. For example, if your warp is sett at 24 ends per inch and your pattern repeat is 48 ends or more, your inlay areas would need to be at least 2 inches wide just to show one repeat of the pattern. Miniature overshot patterns generally work better than large overshot patterns.
Plan your design
You can space the inlay areas randomly throughout a project—that’s part of the fun of this technique. However, if you crave a little more control over your weaving, sketch a master plan of your piece, showing the placement of each inlay area. By following a plan, you won’t overcrowd your piece with inlay. Whatever method you choose, avoid placing inlay areas along the selvedges as that can cause messy edges.
When weaving inlay areas that increase in width, plan ahead. If you increase the width of an inlay area when entering the shed with the shuttle, a loop will show on the surface of the weaving. Instead increase the size of an inlay area when exiting the shed. If this sounds a bit confusing, don’t worry—you’ll get the idea the first time you weave a patterned inlay and see a long loop on the surface of your fabric. (See Photos 1 and 2.)

Photo 1. Increasing the width of an inlay area when the shuttle is entering the shed results in a loop. Photos by Nancy Peterson unless otherwise noted

Photo 2. Increase the width of an inlay area when the shuttle is exiting the shed.
Exact shapes in the patterned inlay areas can be difficult to achieve, especially with four shafts. Weaving circles or curved lines can be especially tricky. Circle shapes need to be woven taller than their width, as the weft will pack down and distort the shape once the cloth is off the loom. (See Photo 3.) On the other hand, varying the width of an inlay area can give an interesting, lacy effect.

Photo 3. Shapes such as circles can be difficult to weave. They should be elongated on the loom to allow for take-up and shrinkage off the loom.
Weaving patterned inlay
It takes a bit of practice to get the feel for weaving patterned inlay by hand. You don’t have the selvedges to guide you in laying in the right amount of weft for each pick. Don’t pull too hard on the pattern weft or it will distort your warp ends. On the other hand, avoid leaving loops at the edges of your inlay areas. Loops indicate you should pull the pattern weft slightly snugger. A light beat is also important. Beat the pattern pick into place gently, then follow with a pick of plain weave. With a little practice, you’ll find it easier to achieve the look you want.
If you weave an inlay area that you don’t like, it’s much easier to use sharp scissors and snip the pattern threads instead of unweaving to remove them. If done carefully, the plain-weave background will show no trace of the removed pattern threads. Just be careful not to snip warp ends by mistake.
Leave pattern weft tails hanging under the fabric on the loom; they should be long enough to thread on a needle. After your piece is off the loom, thread the tails on a needle and sew them into the pattern inlay areas, carefully hiding them under several threads of the inlay on the back. (See Photo 4.) After wet-finishing, trim the tails flush with the fabric.

Photo 4. Hide pattern tails on the back within the inlay area.
You can also embellish your patterned inlay with other fiber techniques. In Photo 5, you can see the embroidered branches I added to the pattern inlay, giving the appearance of dogwood blossoms in the forest during early spring. You will probably think of other embellishments for your projects. Remember, this is an opportunity to add something special to your plain-weave fabric—let your creative side have free rein!

Photo 5. Add embellishment to your inlay on or off the loom.
Resources
- Dixon, Anne. The Handweaver’s Pattern Directory. Loveland, Colorado: Interweave, 2007.
- Dooley, Pipyr. “Weaving Patterned Inclusions/Inlays on a 4-Shaft Loom.” YouTube, February 17, 2016.
- Strickler, Carol, ed. A Weaver’s Book of 8-Shaft Patterns. Loveland, Colorado: Interweave, 1991.