I imagine that almost everyone has woven with paper at some point. Perhaps it was at summer camp or in school, but wherever it was, you probably enjoyed weaving strips of paper. It’s a simple but engaging pastime that can teach some interesting weaving and design concepts that you can sometimes adapt to traditional handweaving.
I’m going to walk you through just a few of the many paper-weaving techniques. If you find it intriguing and want to pursue paper weaving further, you can find inspiration and other techniques readily available on the internet. Currently on Instagram, there are over 22,000 entries for #paperweaving alone!
Supplies
You need a few common crafting supplies to get started. Paper of almost any kind will work, but some types are easier to work with than others. Look for paper that is flexible and thin enough to make interweaving easy but sturdy enough to survive the manipulation it will go through. Copy paper, cardstock, and scrapbooking papers work well and come in many colors. Look also for interesting images in magazines or junk mail, saved greeting cards, and printed or decorative papers. Another option is to print photos on regular copy paper. For cutting, you’ll need paper-cutting scissors; a ruler, either metal or with a metal edge; and a pencil or marker. Although not necessary, a craft knife and cutting mat are useful, and a paper cutter is helpful for cutting lots of strips evenly and quickly. Use cellophane tape or easy-to-remove painter’s tape to hold your work steady. To preserve your woven pieces, a glue stick or PVA (polyvinyl acetate white glue) works well, or you can opt for a tape that is more permanent.
Learn the basics with plain weave
The simplest way to begin is with a single sheet of paper for the warp and one or more sheets of contrasting colors for the weft. Determine your warp’s orientation and draw a margin line ½ inch to 1 inch from the top edge of the warp sheet. Starting from the bottom, cut up to the margin line to create warp strips. If you want the warp strips to be straight, measure and mark them before cutting, but freehand cutting also works, see Photo 1. Once you have cut the warp strips, temporarily tape down the top of the warp sheet to your work surface to keep it from shifting around as you weave.

1. The simplest way to start is with one sheet for the warp and straight cuts.
Cut weft strips slightly longer than the width of the warp sheet so you can secure the edges with glue or tape later. For the weaving to show well, pick weft colors that are different from the warp. Weave the weft strips into the warp in plain-weave alternation, over one/under one across a row. For the next row, do the opposite: under one/over one all the way across. Slip the first weft strip up to the top margin and slide each new weft row up close to the last to make the weaving firm, see Photo 2. Be sure to keep the warp strips from drifting apart, side to side, as you near the bottom of the sheet.

2. Using weft strips slightly longer than the width of the warp paper, weave plain weave.
It’s sometimes helpful to have a margin at both top and bottom edges of the warp sheet to prevent the warps from shifting. To prepare the warp sheet for this, fold it in half horizontally, bringing the top and bottom edges together. Measure and mark a margin across the edges that are opposite the fold. Starting at the fold, cut slits up to the marked line. Unfold the warp sheet and begin the weaving, see Photo 3. The final weft strip at the bottom margin can be a bit tricky to slip into place and might need to be cut just a bit thinner than the others to fit.

3. By folding the warp paper in half, you can create borders at the top and bottom of your weaving.
When finished, you can secure the weft strips by putting a bit of glue under them along the edges. You could also turn the weaving over carefully and use cellophane tape along the sides to secure the strips, or glue the weaving to a background.
Plain-weave variations
One of the simplest variations is to cut warp strips or weft strips of different widths to create a more complex look. Other modifications include making openings in the weft and/or warp strips, possibly with a round or decorative punch, or using the craft knife to cut shapes within the strips.
Rather than cutting straight warp strips, cut curves or zigzags, running from the bottom to the top margin, see Photo 4. Keep the weft edges straight to make it easier to slip the strips close together as you weave.

4. Feel free to cut the warp in different widths or shapes or cut openings in the strips to add drama.
Instead of one sheet of paper serving as warp, cut separate strips and tape them down onto a background sheet with a bit of painter’s tape at the top. This allows you to arrange different colors of warp side by side. You might also vary the width of the warp strips as well as the wefts. See how easily you can create more possibilities with just a little modification in the process? Once you begin to change the warp and weft colors, you can experiment with random arrangements, or with planned color-and-weave patterns, see Photo 5.

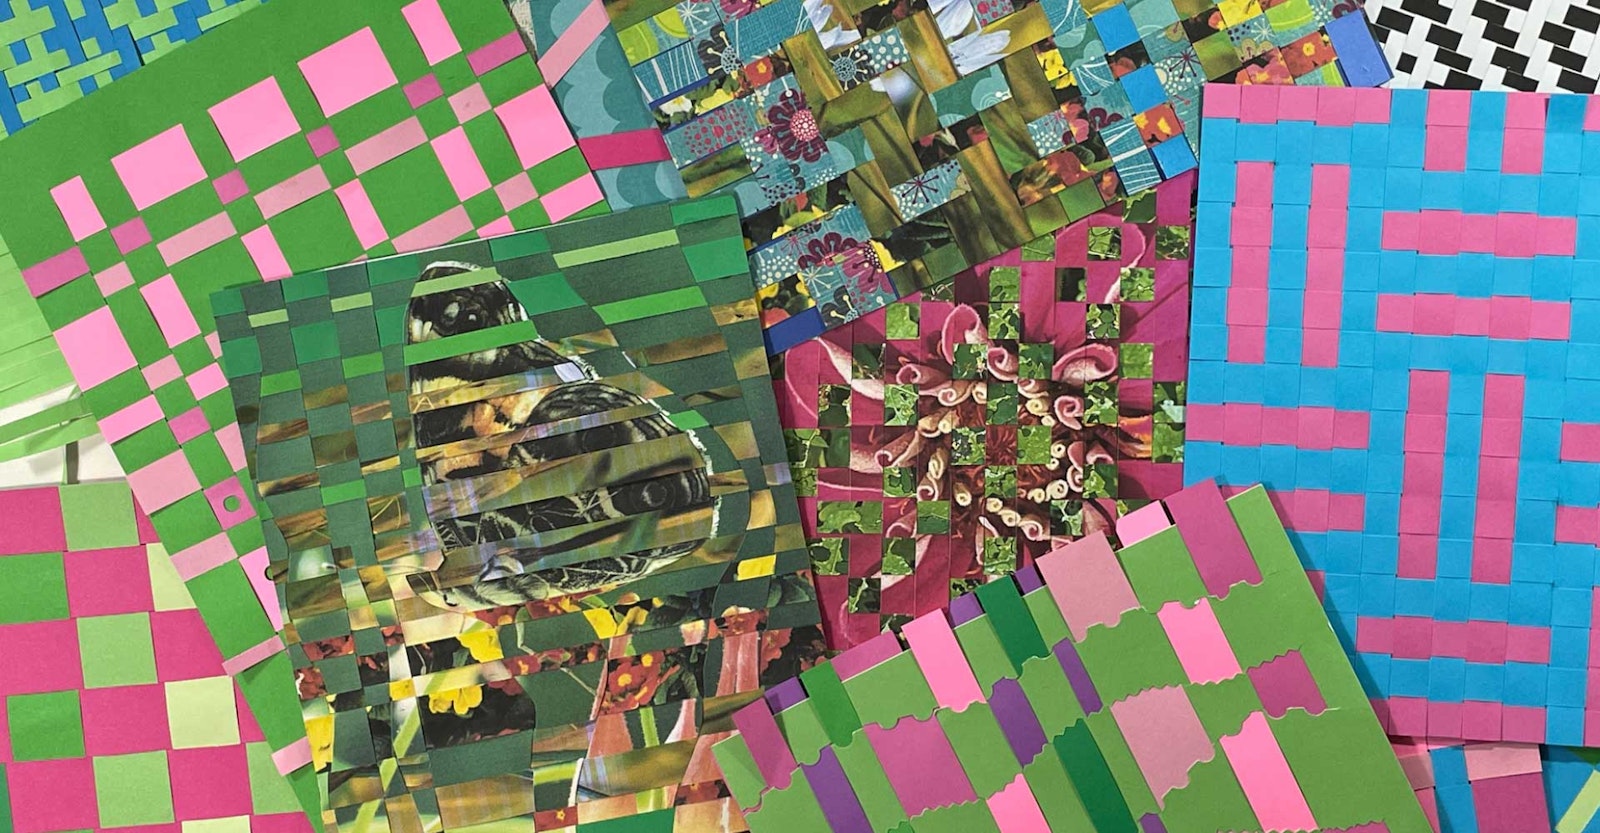
5. Explore color-and-weave designs with contrasting paper colors.
Everything I’ve described heretofore using solid-colored papers can also be done with decorative and/or printed images. Weaving with printed and decorative papers results in more visual complexity. You can even selectively shape the warp strips in some areas to show more of the designs on the papers, see Photo 6.

6. Cutting curvy warp strips, in this case with printed papers, creates interesting effects. Note that the weft strips are straight.
Beyond plain weave
Why not take these ideas further by using other weave structures? Weaving drafts from many sources can be used as the basis for paper-woven versions. As you explore weaving drafts, you might want to make the warp and weft strips smaller so that the weave pattern shows more prominently. A simple way to do this is to use 1/4-inch grid paper for your warp. You can purchase grid paper or use free downloadable PDFs of grids or lines available from Kevin MacLeod’s website, incompetech.com (see Resources). This allows you to plan your grid spacing and create vertical lines at intervals you’d like. Print custom grids or lines on regular copy paper or on cardstock and then cut along the lines with scissors or a craft knife. Alternatively, if you have a paper shredder that cuts long, narrow strips you might try that for making warps and wefts, as suggested by Alison Irwin in her 2006 Handwoven post, “Weaving with Paper” (see Resources). For complicated weaves with narrow strips, you might find it helpful to use the tip of a bamboo skewer to help lift the warp strips.
Instead of threading warp through heddles on a loom in a particular order, number the top of the paper warp strips in the sequence you want. For instance, you can imitate a straight draw threaded on shafts 1, 2, 3, and 4 by simply numbering paper strips as 1, 2, 3, and 4 and repeating the sequence as you would on a loom. Turn the tie-up and treadling sections of the draft into a lift plan and weave using the weft strips according to the pattern you choose. Just as with the straight-draw threading on a four-shaft loom, plain weave will come from alternately weaving 1 and 3 across one row, then 2 and 4 across the following row. You can also do the equivalent of a rising shed (by lifting the selected warp strips) or a sinking shed (by going over the selected warp strips) in the chosen weave pattern.
The equivalent of four-shaft twills can be woven in paper in ratios of 1/3, 2/2, or 3/1 by using the numbered strips in any sequence as you pick, see Photo 7. For 1/3 twill, at the first weft row, you’ll lift all strips numbered 1 and weave across to cover 2, 3, and 4; for the second weft row, lift all strips numbered 2; next, lift all 3s across; and finally, lift all strips numbered 4. Repeat the four-row sequence with as many rows of weft as you want for the pattern. You’ll notice the diagonal twill line after one repeat, and it will become dominant the more times you repeat the sequence. The weft shows more with this twill ratio since three adjacent warps are covered on each row.
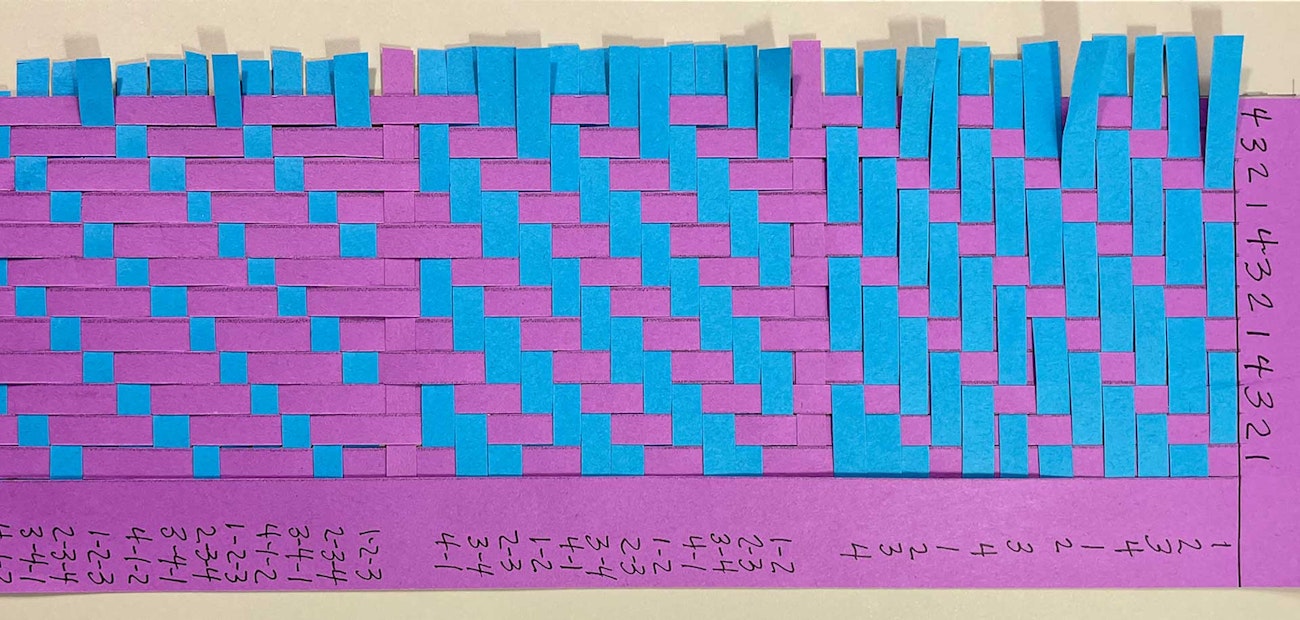
7. Use paper weaving to grasp concepts of simple weave structures.
If you want to weave 2/2 twill, lift all 1-2s on the first row, followed by 2-3s for the next row, 3-4s for the third row, and 4-1s for the fourth row; repeat this four-row sequence as far as you’d like. With this weave, warp and weft strips have equal or balanced roles.
Finally, 3/1 twill is done by lifting all 1-2-3s for the first row followed sequentially for the next three rows by 2-3-4, 3-4-1, and 4-1-2. Now more of the warps are dominant since three are up side by side in each row. For each of these twills, reversing the order at any point will change the direction of the twill line.
You’re not limited to the equivalent of four shafts with paper weaving. You can also weave different twill ratios for multishaft weave structures by using the same concept: x warps up/x warps down. Thus, an eight-shaft twill in several varieties could be created. For example, for a 1/3/2/2 twill, there would be one warp up/three warps down/ two warps up/two down. To set this up, number the warp strips from 1 to 8 and repeat for as many warps as you have. In the first row, lift warps 1-5-6; in the second row, lift warps 2-6-7, and so on, see Photo 8.
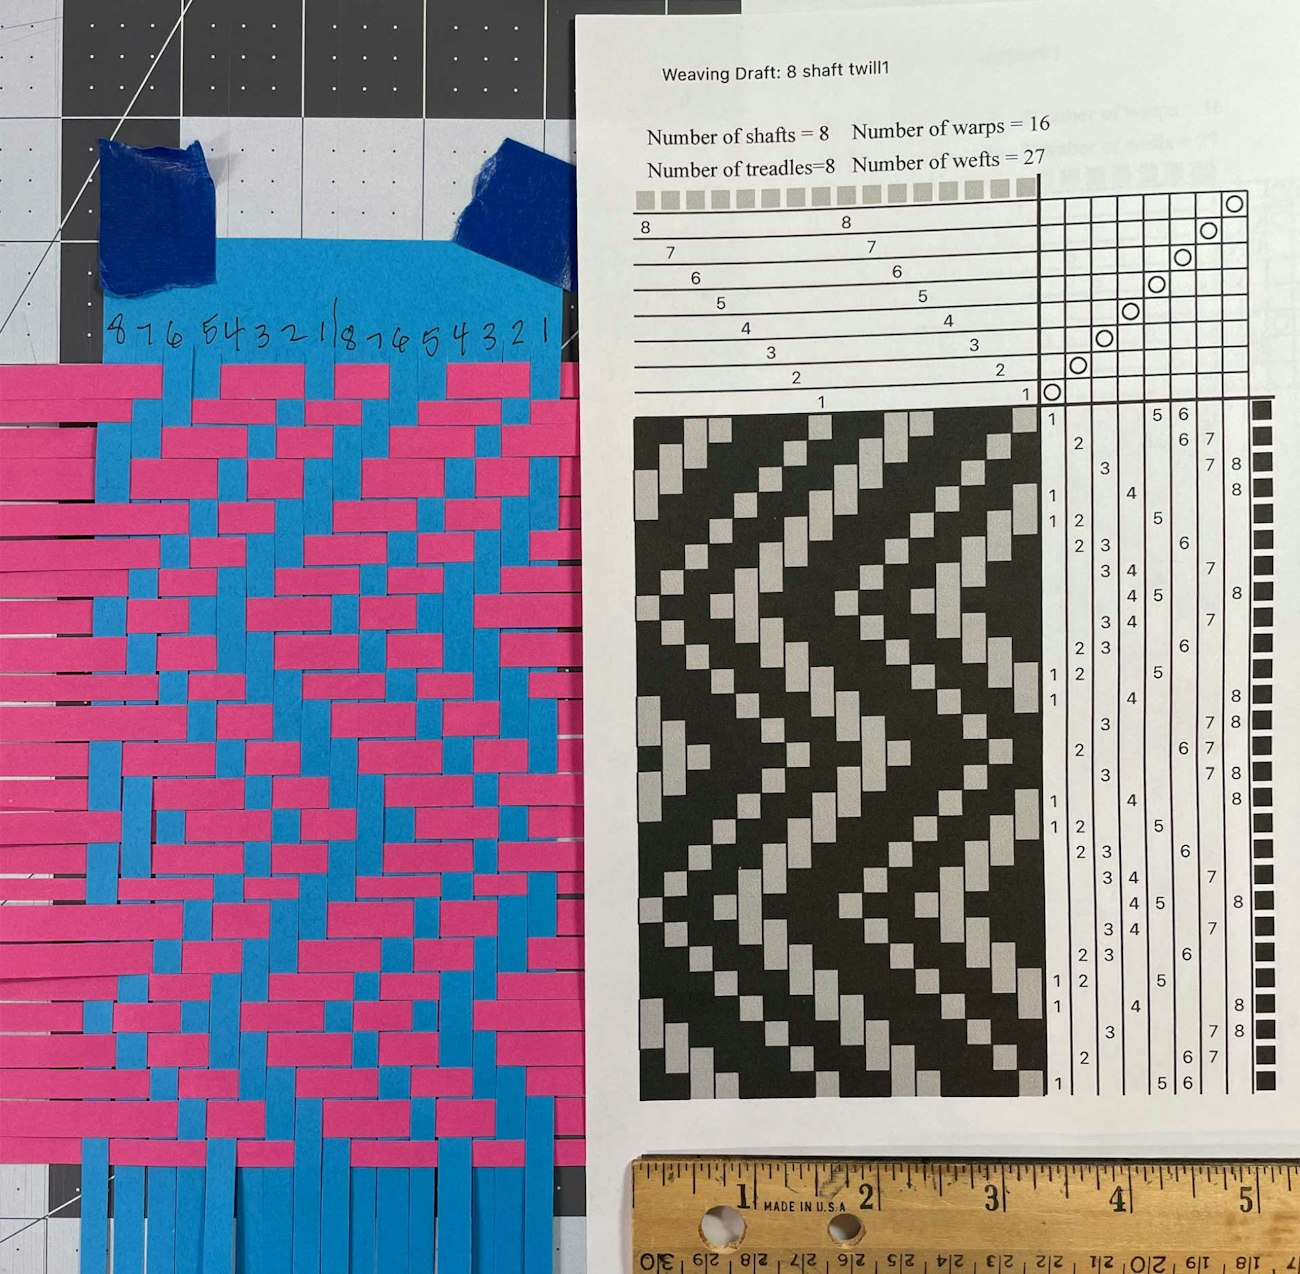
8. Experiment with weave structures that use more than four shafts.
By numbering the strips at the top with the threading sequence of a desired draft and determining the lift plan you want to use, you’ll have the freedom to create paper weavings from almost any threading draft you find. You can also create your own draft without worrying about whether it will be structurally sound as a piece of fabric; after all, you’ll be using tape or glue to hold the warp and weft together, see Photo 9.

9. Long floats that may not be practical in a woven fabric pose no problems in paper weaving.
The versatility of this simple process is nearly endless. Your paper weavings can be artworks in their own right, perhaps showcasing special papers or images. In paper, weave structures that become large in scale can be easily modified as the weaving progresses. Paper weaving explorations can become inspirations for other weaving and fabric design ideas. So why not cut up some paper, begin today, and add your own paper-woven creations to #paperweaving!
Resources
Incompetech. incompetech.com/graph paper/lined.
Irwin, Alison. “Weaving with Paper: Off-Loom Color-and-Weave Coasters.” Handwoven, 2006.
Tommye McClure Scanlin is Professor Emerita at the University of North Georgia, Dahlonega, where she began the weaving program in the early 1970s. She is the author of The Nature of Things: Essays of a Tapestry Weaver and Tapestry Design Basics and Beyond: Planning and Weaving with Confidence.
[Originally published in Handwoven May/June 2022.]