Cartoons are working designs that serve as guides for tapestry, and they can also be used with other discontinuous weft methods of weaving such as inlay and the Theo Moorman technique. They are usually outlines drawn onto paper to be used on the loom, or they can be inked right onto the warp itself with the paper cartoon as a reference. Once an idea emerges for a tapestry and you’ve created the design, the next challenge is how to translate it to weaving. This is where cartoons come in handy.
Here are my methods for making working cartoons.
1 Convert the original design into a line drawing by tracing or copying it.
a Use tracing paper or the drafting film often used for technical drawings. If you will be attaching your cartoon to your warp with stitching, opt for the sturdier drafting film.
b For printed images, place the sheet over the source image and copy the outlines with a permanent marker. If you have trouble seeing the shapes, use a window as a makeshift light box. Tape the corners of the original to the window, tape a sheet of tracing paper on top, and draw the outlines.
c For images on your computer, copy directly from your computer screen using a transparent piece of plastic or acetate, such as a clear notebook divider, and draw with either a permanent marker or a wet-erase marker. (A wet-erase marker lets you clean up the sheet so it can be used again.) Open an image on the computer, place the transparent sheet on top of the screen, and hold it in place while you draw the outlines with the marker—yes, right on top of the transparent sheet resting on the computer screen! Photocopy the tracing to create a line drawing. Afterward, you can clean the transparency sheet, and it’s ready for the next cartoon design (Photo 1).

Photo 1
d Digital tracing from photographs or drawings may be done with a digital graphics tablet using drawing or image-editing apps. Refer to your tablet and application for specifics. (The tools I currently use are an iPad Pro with an Apple Pencil and Adobe Illustrator Draw.)
2 Make the cartoon the size you want for the tapestry.
If the tapestry will be 8.5 × 11 inches or smaller, and/or if the image is on your computer, you can print the cartoon onto a sheet of copy paper. Add the extra margins you need for attaching it to your warp at top and bottom by taping on other paper as described below.
When making a larger cartoon, you have several options.
a If you are able, redraw your design the size you want by drawing directly onto larger paper.
b Use graph paper to scale up your design by redrawing it by hand, translating what you see in the small-scale version onto a larger grid. With pencil, carefully redraw what you see in each smaller square of the original into the corresponding square of the enlargement. Once you’re happy with the way the new, enlarged version looks, go over the penciled lines with a permanent marker (Photo 2).
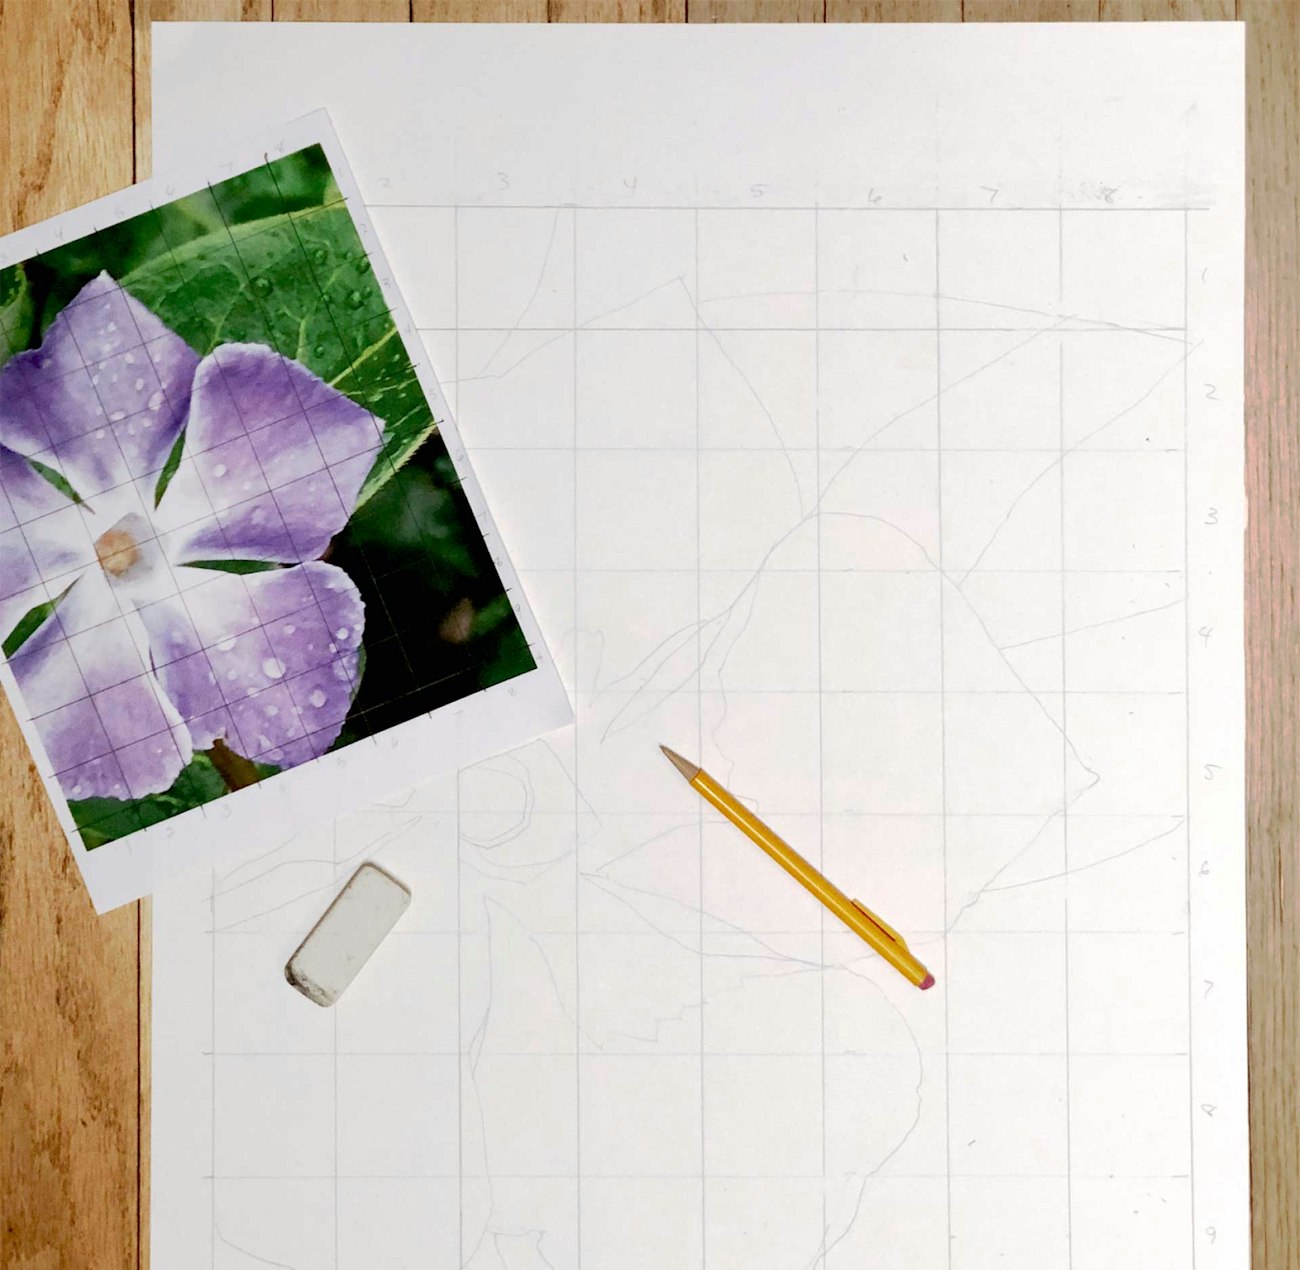
Photo 2
c Resize to the scale you want with an image-editing program (e.g., Adobe Photoshop Elements). Select parts to copy, cut, and paste into separate files, each small enough to be printed and then taped together to make the enlarged cartoon.
d Scan or photograph the design and save it as a digital file to be reproduced on an oversize printer at a print service.
Whatever method you use to make your cartoon, give yourself an allowance of an inch or so at the bottom of the image and several inches or more at the top of the design for attaching it to your warp. The margins allow the cartoon to be fastened at the bottom to get started and provide extra room at the top that can be placed over a cord or a dowel that hangs behind the warp, if need be. If you’re using a floor loom, the extra allowance at the top should be long enough to accommodate attaching the cartoon to the lower edge of the beater. Draw a horizontal line at the bottom and the top of the design to clearly indicate the margin allowance. This will help you align the cartoon as you attach it.
Using the Cartoon as You Weave
You’ve taken time to make the cartoon—now get ready to put it to good use! Here are three options for following your cartoon as you weave.
1 Stitch the cartoon behind the warp. First weave a header or hem of at least ½ inch. Temporarily hold the cartoon in place at the bottom using paper clips, sewing clips, clothespins, or banker’s clamps to keep the cartoon flat against the bottom as you stitch.
Hold the cartoon up behind the warp so you can see at least several inches of the upcoming image to be woven. Do this by draping the cartoon over a cord or dowel behind the warp placed several inches above the area you’re weaving. To use a cord, simply tie a piece of sturdy cord from one side of the frame to the other, pulling it taut as you attach it. You can also suspend a dowel behind the warp to hold the cartoon. Tie each side of the dowel to the top of the loom frame and let it hang so it is several inches above the weaving area; drape the cartoon over the cord or dowel so that the excess falls behind (Photo 3).
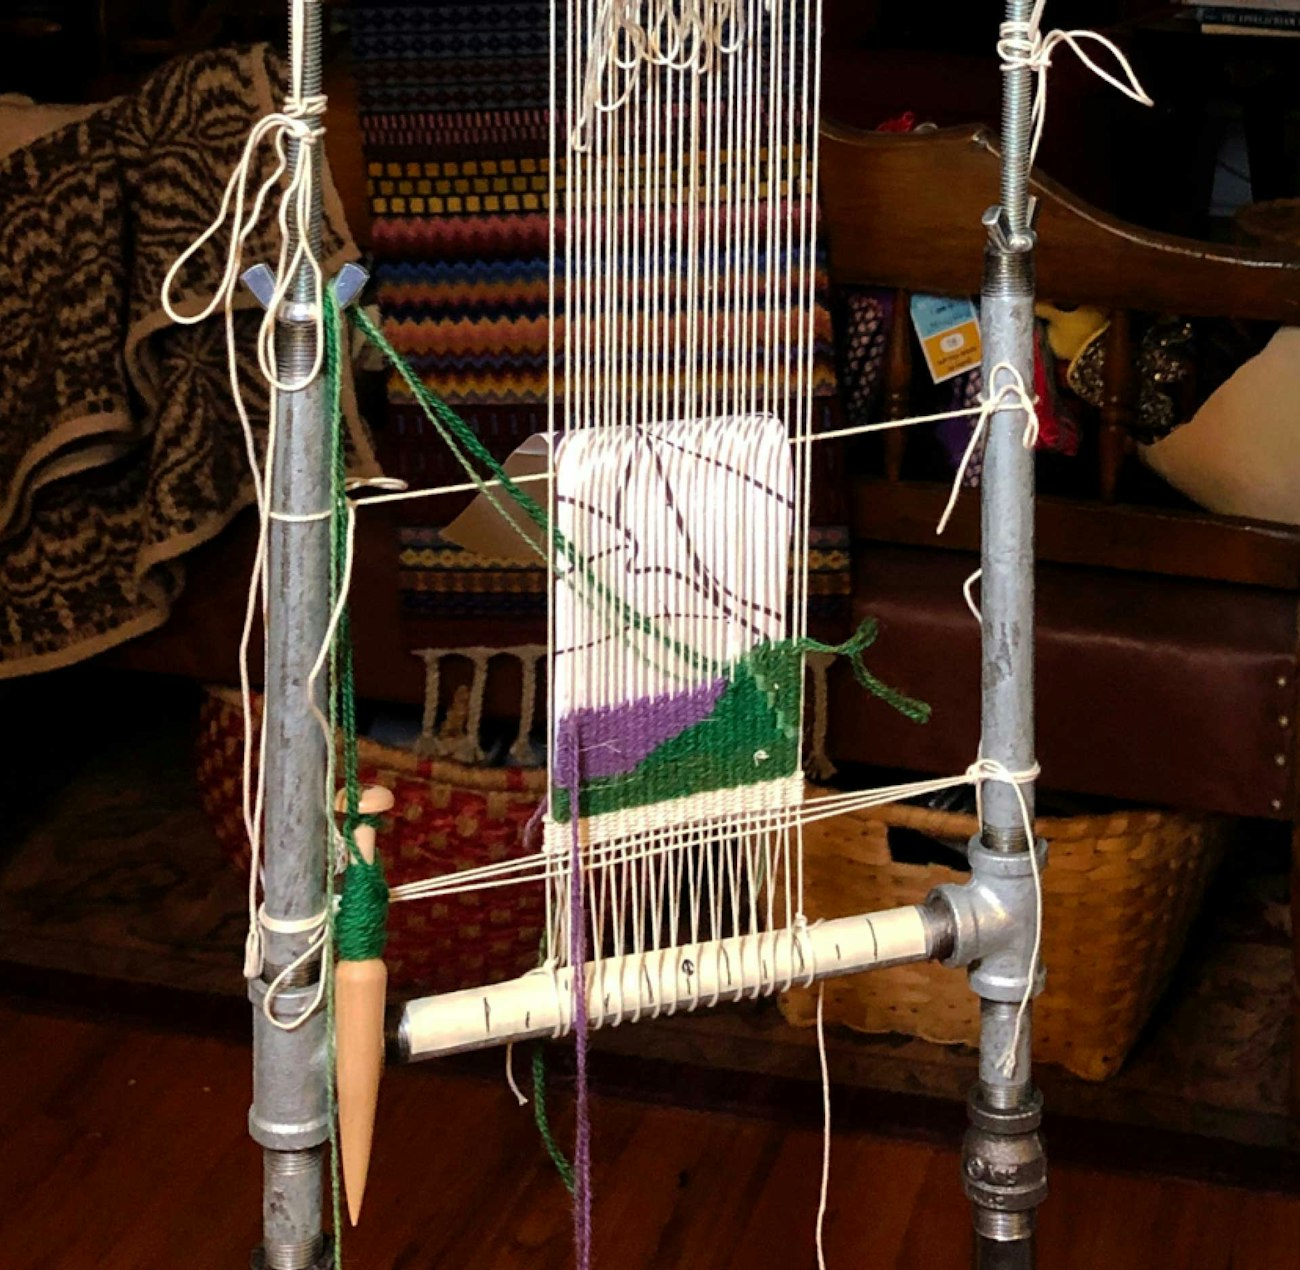
Photo 3
Thread a needle with sewing thread and tie the end onto the needle so that it doesn’t slip out of the eye as you work. Make a large knot at the opposite end. Stitch through both the weaving and the cartoon paper with long running stitches to hold the cartoon against the surface of the weaving. Use a curved needle if you have one so that you can push the tip through to the cartoon and back to the front in one sweep. Hold the thread firmly where it emerges so it doesn’t slip while you poke the needle in for the next stitch. Knot the thread through itself at the last stitch and clip off (Photo 4).
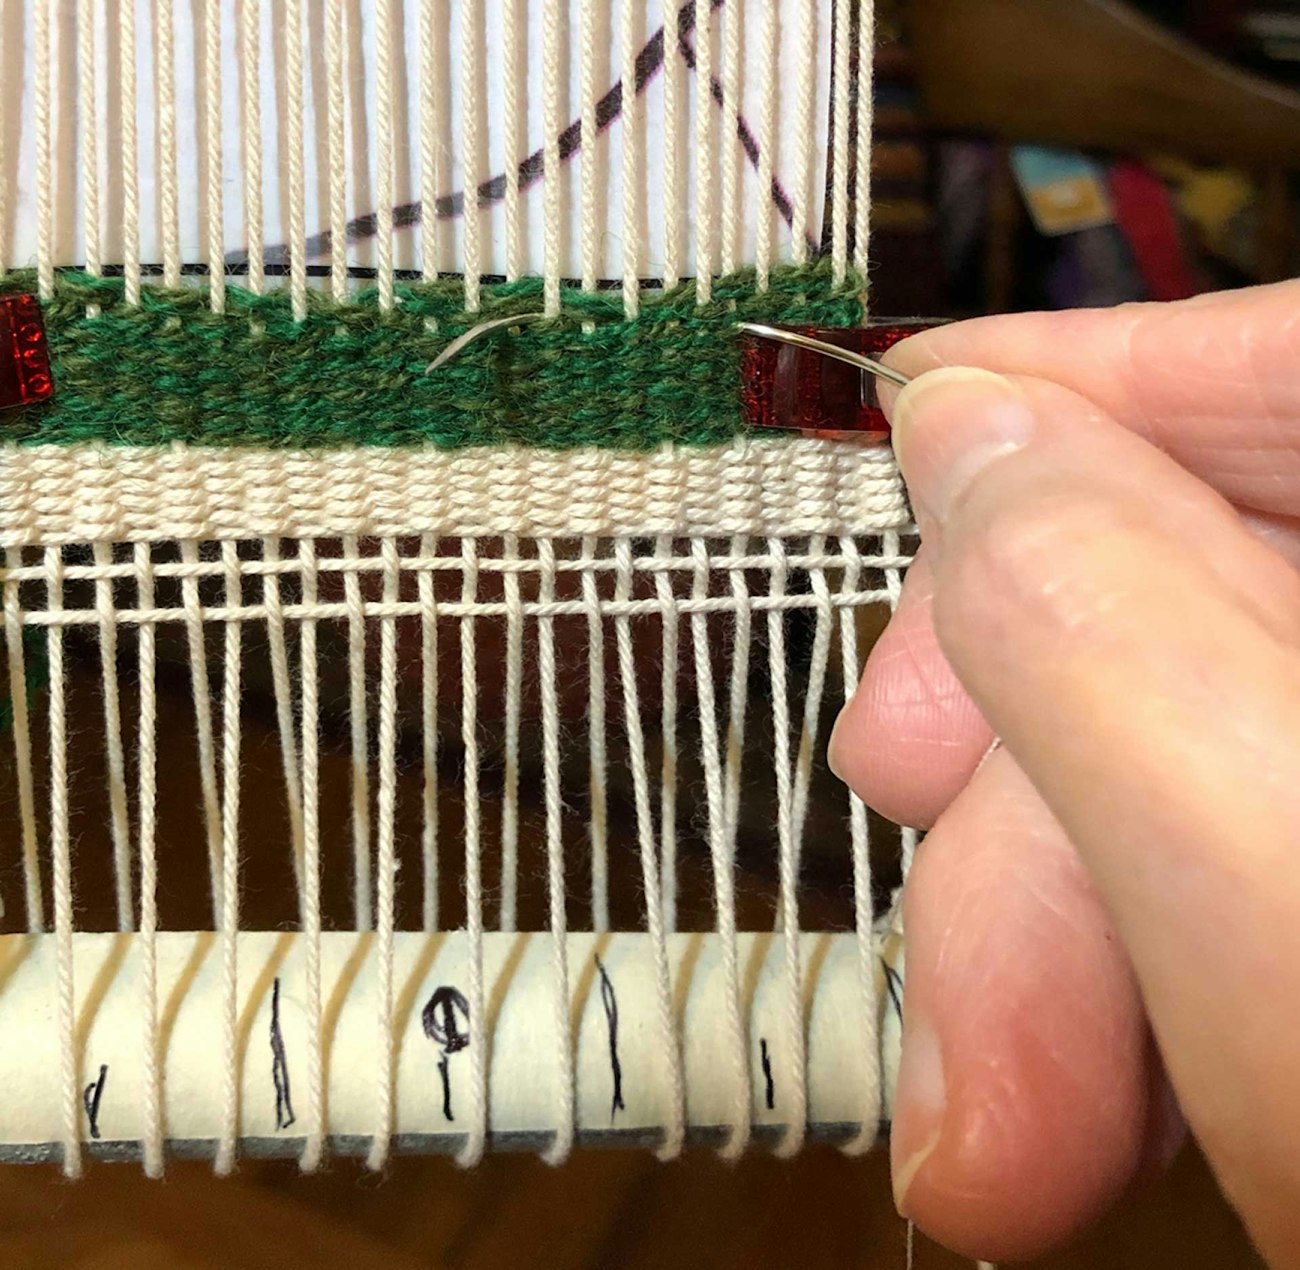
Photo 4
As the tapestry grows, other rows of running stitches will be added near the top of the weaving area. Clip out previous stitching after adding a new row, especially if you’re using a continuous warp on a tapestry loom or winding onto a cloth beam, because the cartoon should not be rolled up with the tapestry (Photo 5). If you build shapes as you weave, rather than traveling across each row, stitch about ½ inch from the woven edge to keep the cartoon close to the weaving as reference.
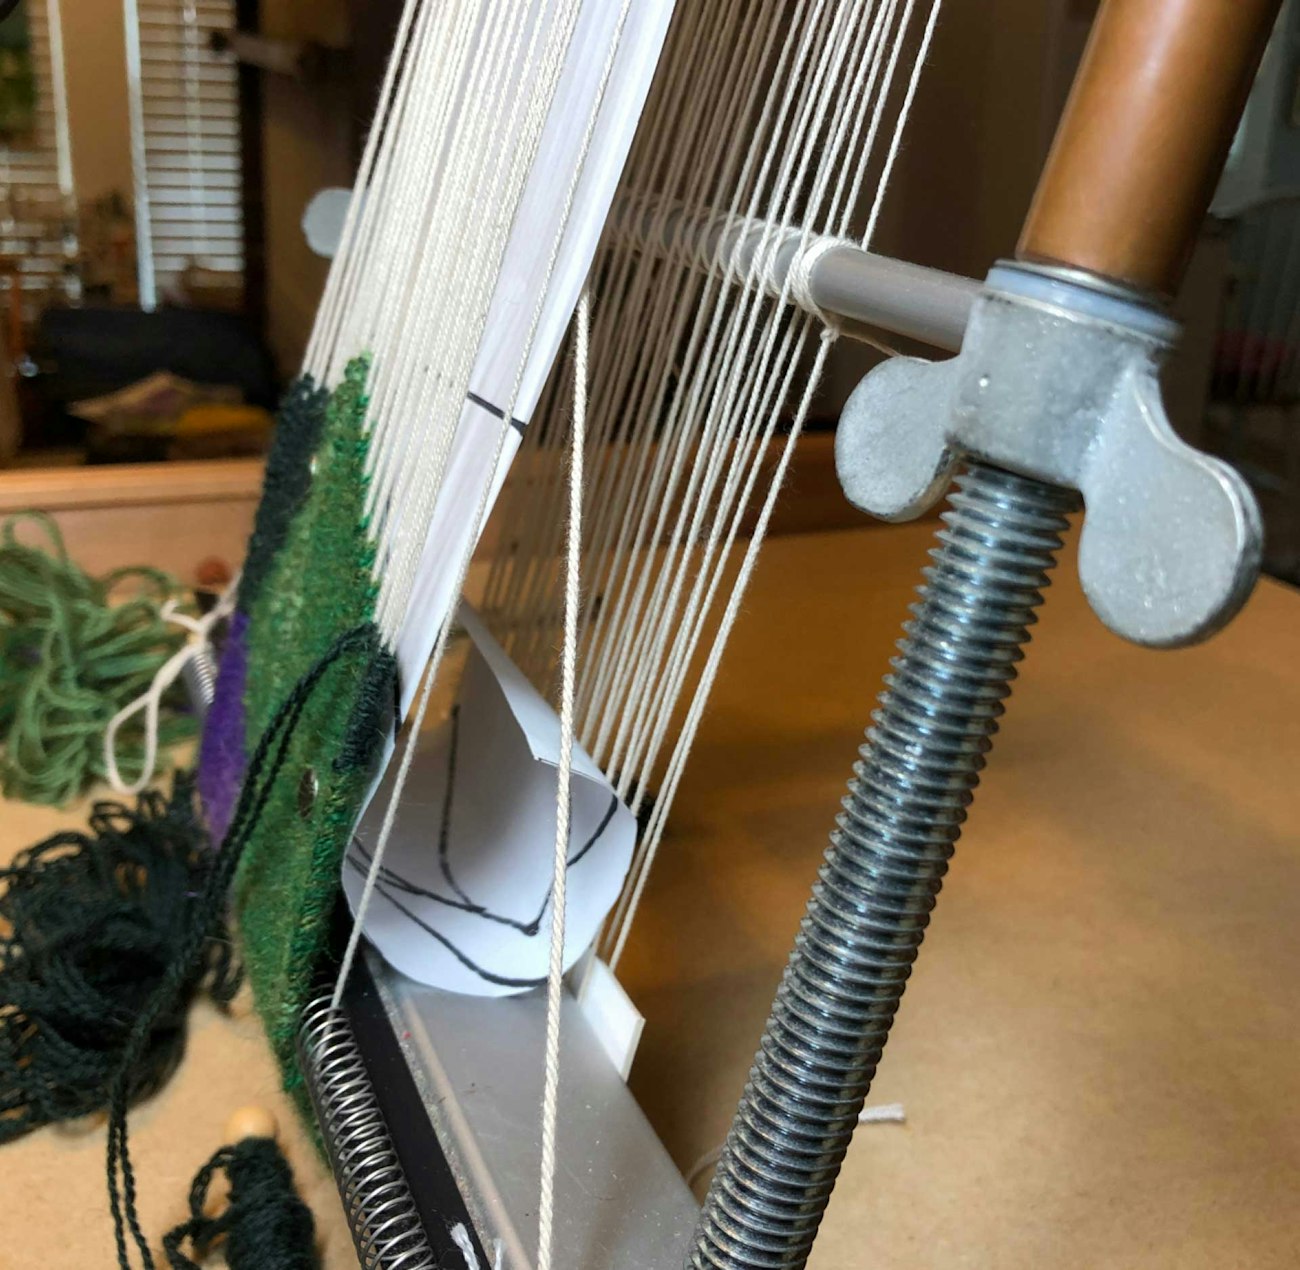
Photo 5
2 Use small magnets to hold the cartoon. Position the cartoon behind the warp. Use a pair of magnets, one on the front of the weaving and one behind the cartoon to hold it in place. Be sure to put the magnets on the tapestry, not the empty warps. Several pairs of magnets will be needed across the width of the tapestry, about 3 to 5 inches apart. Slide the magnets up by moving the front one of the pair as the tapestry progresses to keep the cartoon close to the weaving area (Photo 6). If you decide to use this method, please check precautions on the packaging; magnets have certain safety risks and can be extremely dangerous for pets or children if ingested, so use care!
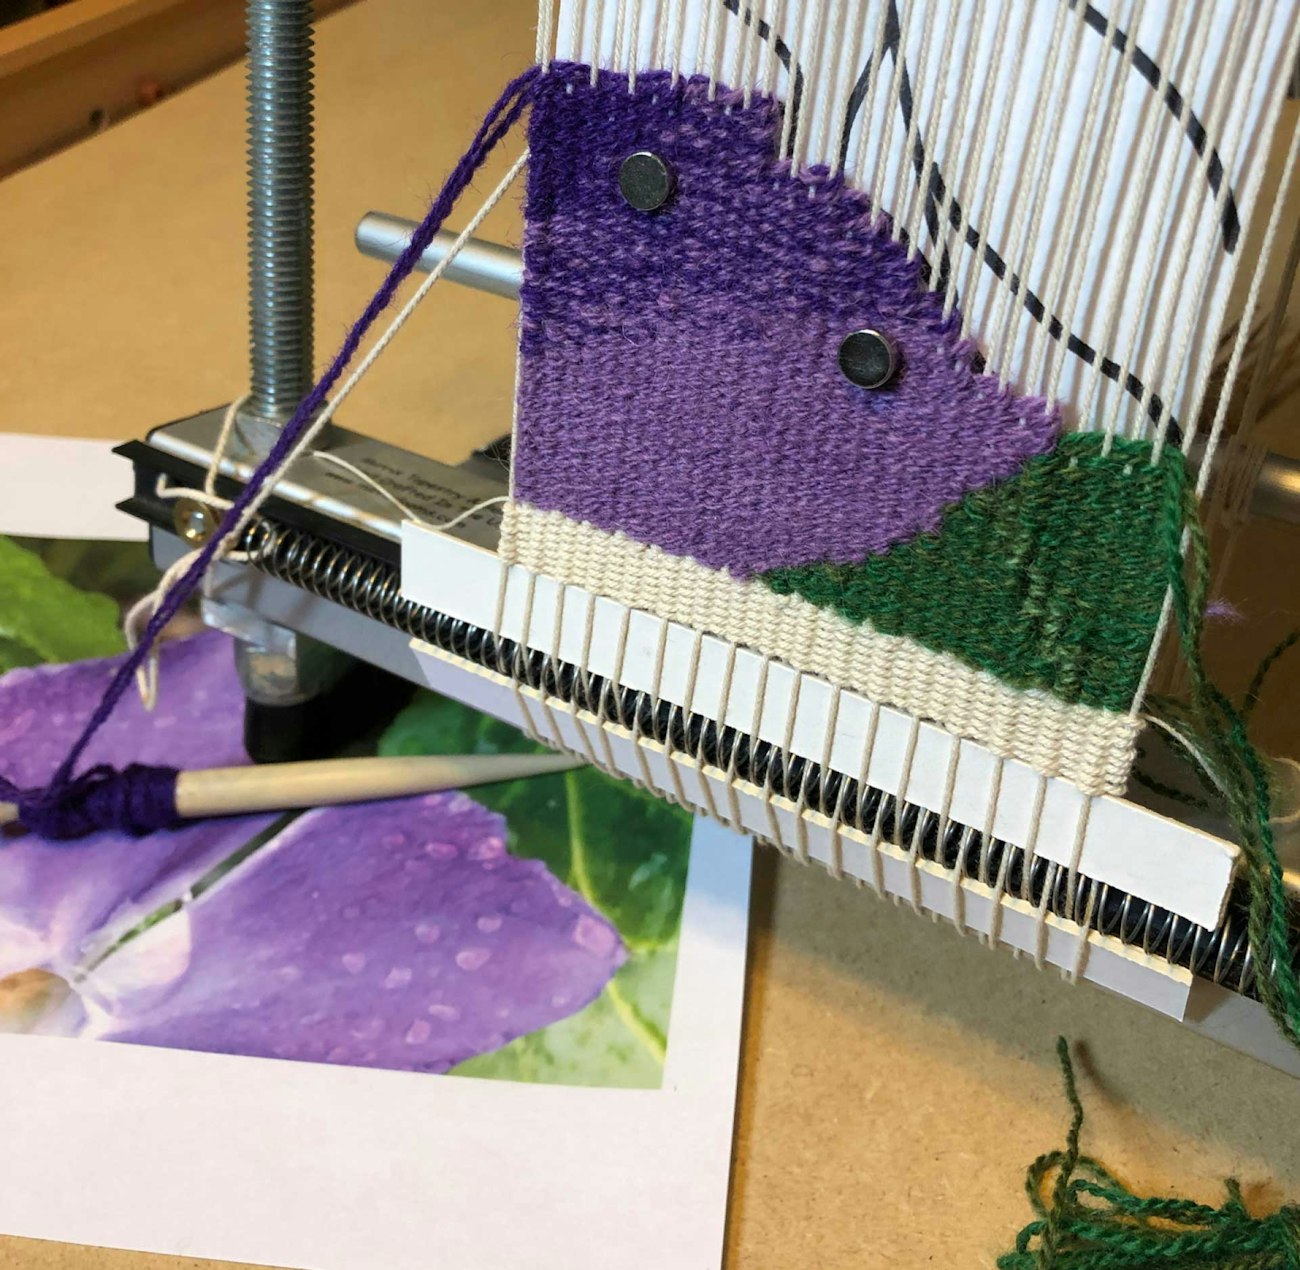
Photo 6
3 Ink the warp. Use waterproof ink and a pen nib or a small brush for this process, or use permanent fabric markers. Test any type of ink you use to be sure it doesn’t run when wet.
Close the shed to flatten the warp. If you’re using a loom on which one shed is permanently open, flatten it by tying a strong cord to one side of the loom frame several inches above where the inking will be done and weave it through the opposite shed. Pull firmly and tie to the other side of the loom frame. Ink the warp, then remove the cord when the ink is dry.
Attach the cartoon at the bottom. For accurate inking of your design, hold the cartoon tight against the warp with a couple pieces of cord tied in a large X configuration to the loom frame behind the cartoon, or use a stiff piece of cardboard pressed against the back of the cartoon.
Follow the paper cartoon as you ink onto the warp, moving across from one side to the other. Take care that you don’t smudge the ink as you work. Let the ink dry, then go back to each warp end and mark again while twisting it with your fingers. Otherwise, when the warp ends shift around when changing sheds, you’ll lose track of the inked marks (Photo 7).
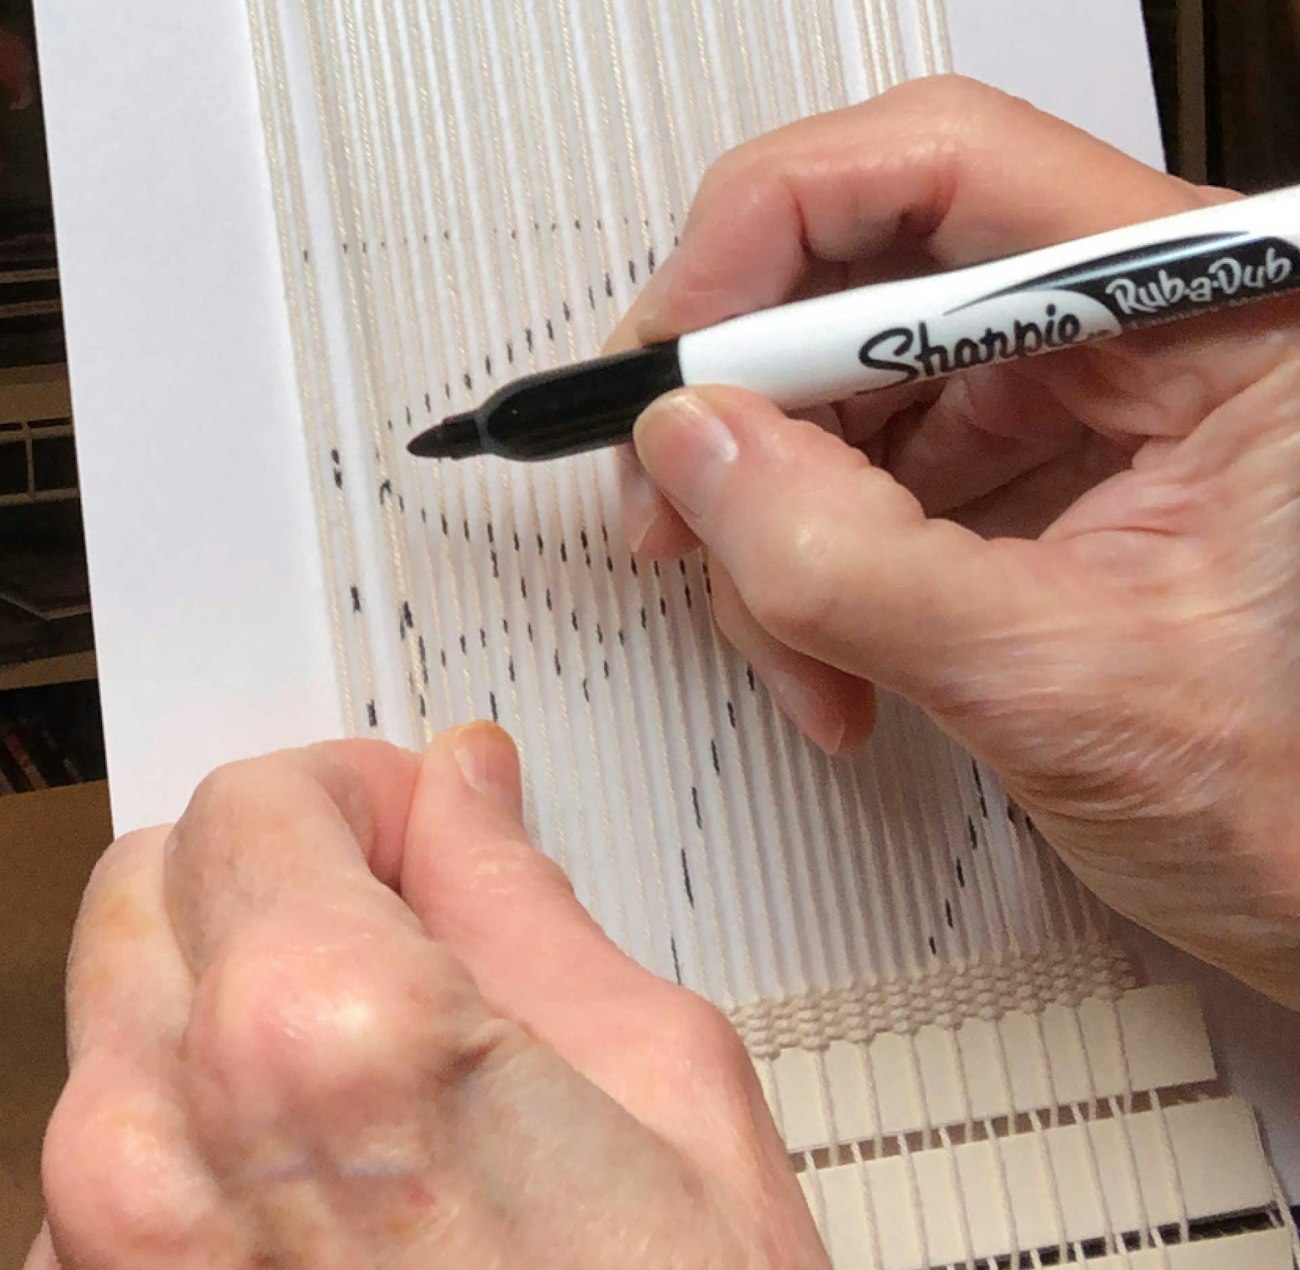
Photo 7
Let the ink dry completely (maybe even overnight) before starting to weave to avoid smudging. If the tapestry is small, you could draw the entire cartoon, but it’s often more convenient to mark only several inches at a time.
When you’re ready to weave, release the paper cartoon from the X-configuration cords or remove the cardboard. You can take the paper cartoon off the loom if everything has been inked or leave it on the loom, hanging behind the warp to be brought back up when you’re ready to ink more warp or to check the design for accuracy.
Using Cartoons with a Floor Loom
Set the loom up in such a way that you’ll be able to use the beater with the cartoon in place. Stitch the cartoon on or ink from it, as described for tapestry looms.
If you are attaching your cartoon with stitching, you need a dowel about ½ inch in diameter and long enough to allow the paper cartoon to hang over it and still have a few inches allowance at each side where it will be attached to the beater. You’ll also need at least two sturdy, large rubber bands or elastic hair bands (Photo 8).
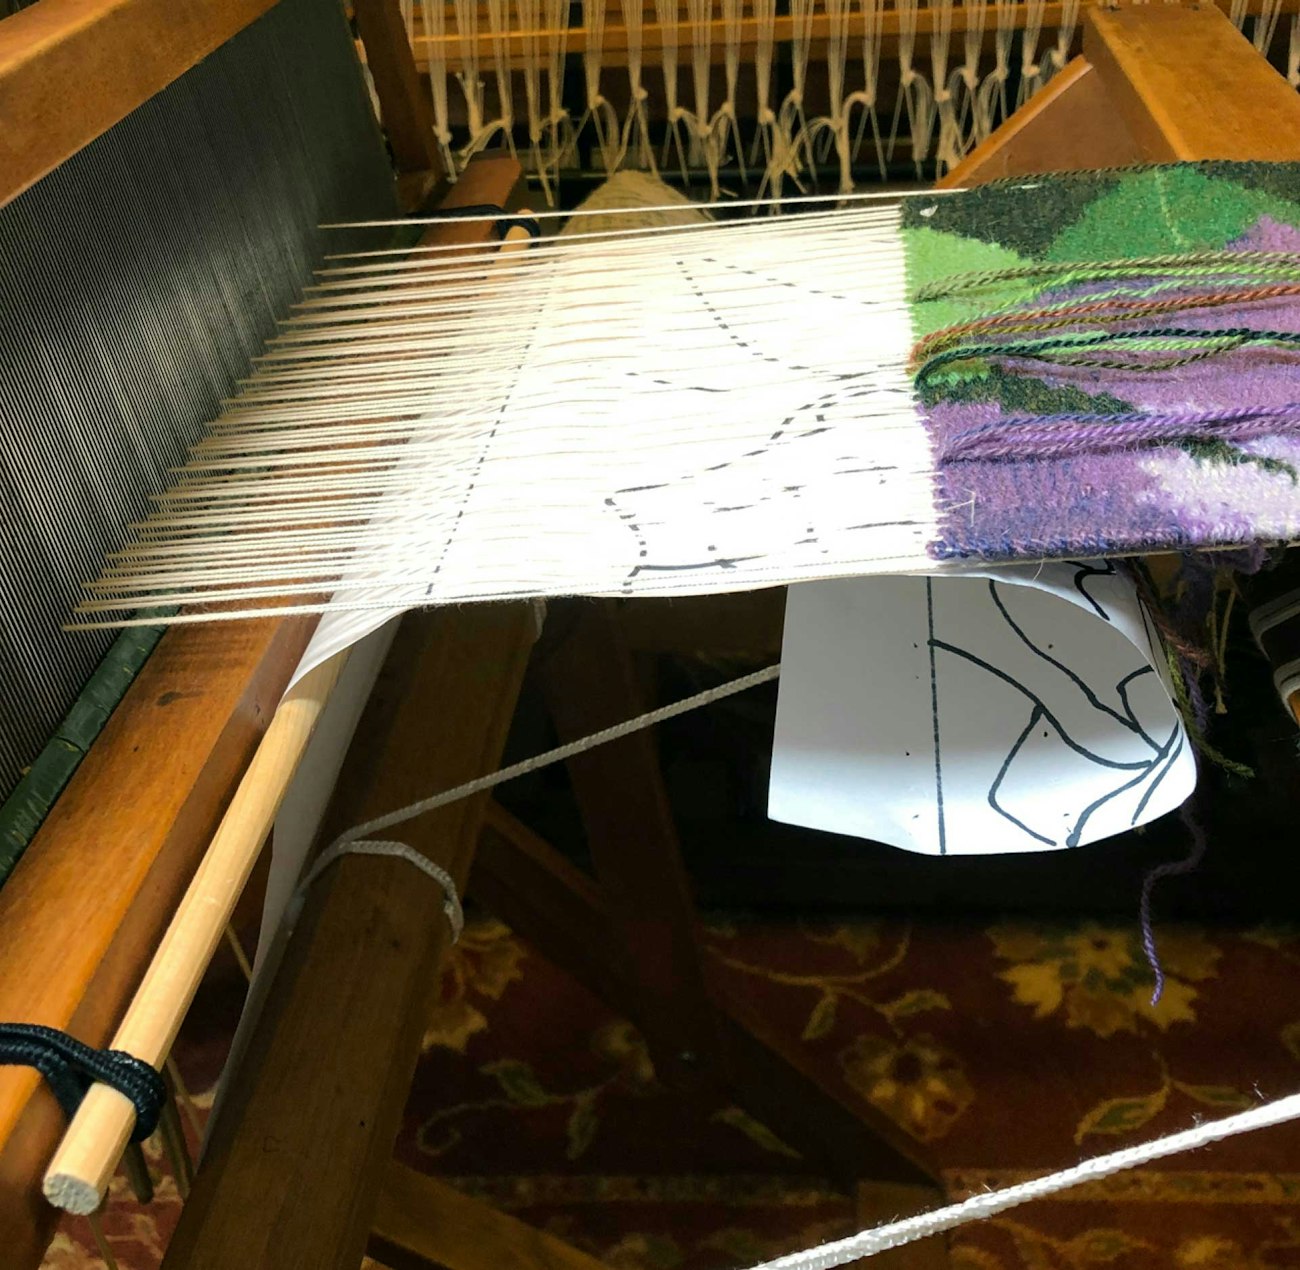
Photo 8
Weave at least an inch of header or hem. Fasten the bottom margin of the cartoon to the weaving with paper clips, sewing clips, clothespins, or banker’s clamps. Slip the dowel under the cartoon and move the paper and dowel up to the beater, where the dowel will be attached to the shuttle race. At each side, loop one end of the elastic band around the dowel, take the band around the shuttle race, and then catch the other end loop onto the dowel. You might have to link two bands together at each side to make them long enough to encircle the shuttle race and the dowel.
Adjust the dowel so it stays just below the level of the shuttle race. If you want to attach your cartoon with stitching, do this now. You could also ink the design onto the warp in stages as you weave since you’ll have only a few inches at a time in front of the beater for this method.
When you use the beater, the cartoon will ride over the top of the dowel to come back to the fell line, with the excess length of the cartoon moving forward and hanging down. When the beater is pushed back, the cartoon will ride up and back into place. Of course, you can also build shapes using a hand beater rather than the loom beater.
As you advance, secure the cartoon with a new line of stitching every couple of inches. Clip out previous rows of stitches so that the cartoon doesn’t travel over the breast beam and begin to roll up with the tapestry. If the tapestry is long, loosely roll the cartoon up under the dowel and below the stitching area so that it isn’t in your way. Use a paper clip to hold it at each side.
Using a cartoon as a guide isn’t the only way to weave tapestry. You may find great pleasure in letting the shapes build freely as you move up the warp. But if you do want a more planned approach, one in which you can see your designs turn from original idea to paper and then to tapestry, cartoons may be for you. Give each method I‘ve mentioned a try, and once you feel confident in using cartoons, I’m sure you’ll develop ways that work best for you. Many happy tapestry weaving hours to you!
Tommye McClure Scanlin is Professor Emerita at the University of North Georgia, Dahlonega, where she began the weaving program. She is the author of The Nature of Things: Essays of a Tapestry Weaver (University of North Georgia Press, 2020) and Tapestry Design Basics and Beyond: Planning and Weaving with Confidence (Schiffer Publishing, forthcoming in spring of 2021).