I vividly remember what it was like as a non-weaver to look at a multishaft draft and not understand a single bit of it: the horizontal and vertical lines, the numbers and dots, the boxes and slashes, the columns. How could that collection of marks on a page possibly hold enough information to tell anyone how to weave the beautiful cloth shown next to it? Where would a person even begin?
Whether you’re new to weaving altogether or you’re experienced in rigid-heddle, tapestry, or inkle weaving but new to multishaft looms, here are three steps for understanding a multishaft draft so you can put your loom to work weaving something wonderful.
The drafts you’ll find in Handwoven follow the conventions I describe below, as do many (if not most) drafts you’ll find published in books and other sources.
Step 1: Start in the upper right corner
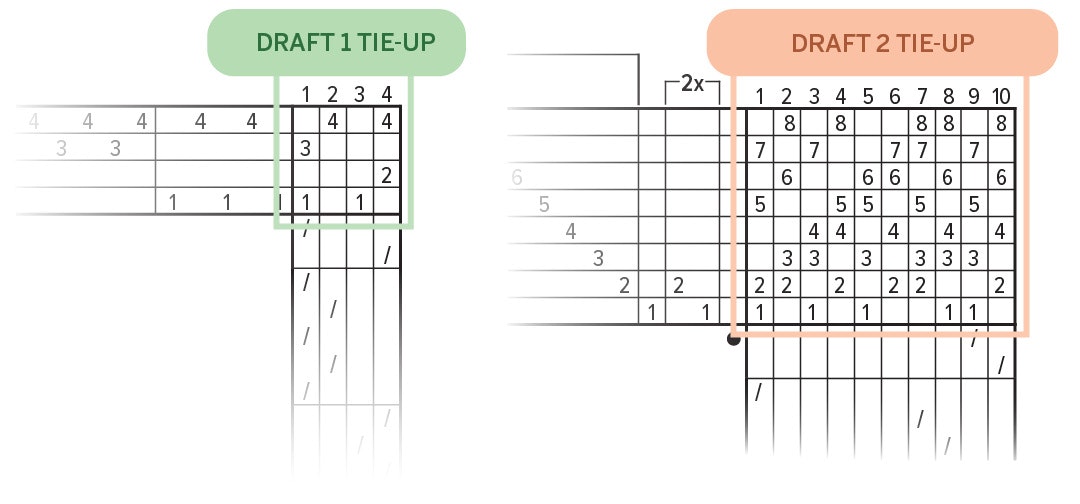
The gridded box in the upper right corner of a draft is called the tie-up. It’s a great place to begin when you first look at a draft, because this little box provides basic information about the equipment you need to weave the draft.
The number of rows in a tie-up tells you how many shafts that particular draft requires. The tie-up shown in Draft 1 has four rows, so this draft requires a loom with four shafts. The tie-up shown in Draft 2 has eight rows, so this draft requires a loom with eight shafts.
The number of columns in a tie-up tells you how many treadles that particular draft requires. The tie-up in Draft 1 has four columns, so this draft requires a loom with four treadles. The tie-up in Draft 2 has ten columns, so this draft requires a loom with ten treadles.
As you prepare a loom for weaving a draft, you will physically tie the treadles to the shafts as shown in the tie-up box. In Draft 1, treadle 1 is tied to shafts 1 and 3, treadle 2 is tied to shaft 4, and so on.
Step 2: Now look to the left
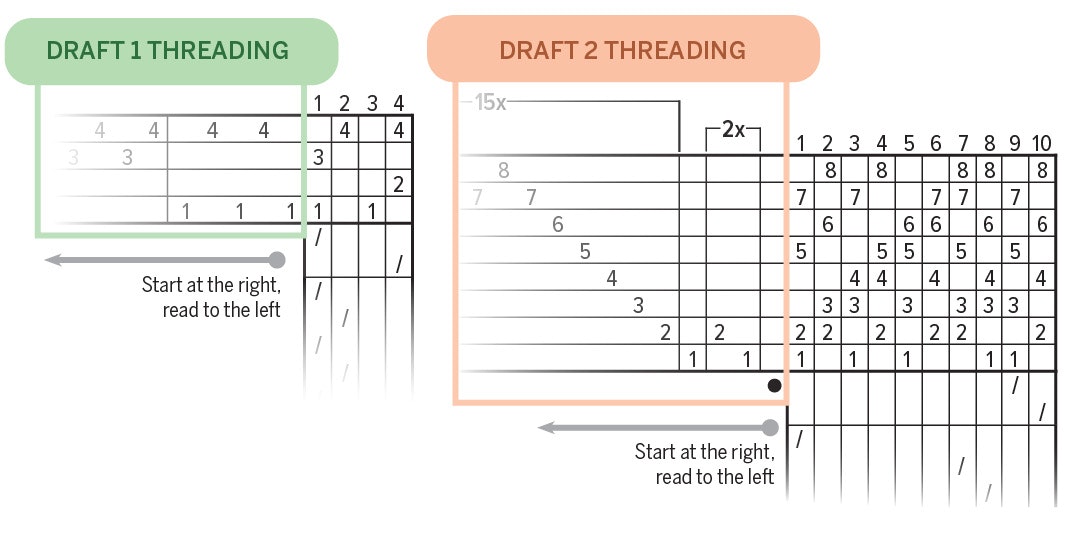
The draft’s threading extends to the left from the tie-up. Each row in the tie-up and threading represents a loom shaft, beginning with shaft 1 at the bottom, followed by shaft 2 in the next row up, and so forth.
Moving from right to left starting at the tie-up in the corner, the threading shows the shafts that individual warp threads (or warp ends) need to be threaded on to weave this draft. The threading is indicated using small row numbers (as in these examples), or colored or black dots or boxes, in the appropriate rows. If a threading is too long for one line, it will continue in a new box underneath (and again, follow it from right to left).
For example, the four-shaft threading in Draft 1 begins with a warp end on shaft 1, followed by an end on shaft 4, then ends on 1, 4, 1, 4, 3, and so on.
The eight-shaft threading in Draft 2 begins with a warp end on shaft 1, followed by an end on shaft 2, then... Wait, this threading looks different! What comes next?
Take a look at the brackets above some areas of the Draft 2 threading. These notations tell you that a section needs to be repeated the specified number of times. In this threading, you begin with shafts 1 and then 2 twice, then shaft 1, then you repeat a sequence beginning 2, 3, 4, etc. fifteen times, and so on.
You may notice one other thing in this threading: There’s a small black dot underneath shaft 1 at the beginning of the threading. This dot represents a floating selvedge end, which doesn’t get threaded on any shaft. You’ll find them on some but not all drafts. You can learn more about floating selvedges here.
If a draft uses a single color of warp yarn, this is all the info you need to thread the warp. If a warp uses multiple colors, you also need to know what those colors are and where they need to be threaded. In this case, the draft may also include a warp color order like the one you see below.

This warp color order (which is read from right to left, just like the threading order) tells you that the first 5 warp ends are Black, the next 13 ends are Avocado, the next 3 ends are Black, and so forth. Used in conjunction with the threading draft, the warp color order explains how to thread warp ends that are the right colors, in the right order, on the right shafts.
Step 3: Now look down
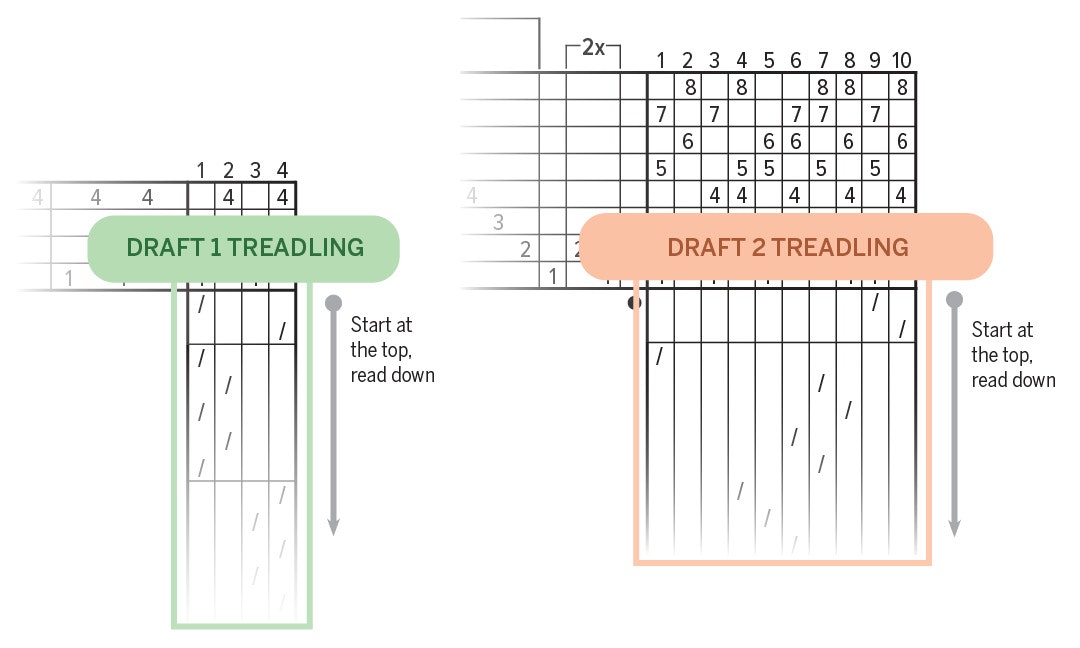
The draft’s treadling starts just underneath the tie-up box and extends downward from there. Treadle 1 is the first column on the left, treadle 2 is the second column, and so forth.
Each row in the treadling represents one weft pick. Moving from top to bottom, use the treadle or treadles indicated by boxes, circles, or slashes in each row to raise the appropriate shafts, then throw the shuttle holding your weft yarn, beat the pick, and move on to the next row of the treadling. If a treadling is long, it will continue in another box to the left (again, follow it from top to bottom).
The four-shaft treadling in Draft 1 begins with treadle 1, followed by treadle 4, then treadles 1, 2, 1, 2, 1, 4, and so on.
The eight-shaft treadling in Draft 2 begins with treadle 9, followed by treadle 10, then treadles 1, 7, 8, 6, 7, and so on. And just as in threading, treadlings may include bracketing to indicate that you must repeat a sequence of treadles a specific number of times (or until you’ve woven to a particular length).
Single-color wefts require no additional info about treadling. Wefts that use multiple colors may have specific colors indicated as part of the treadling, or they may be accompanied by a weft color order. As with warp color orders, weft color orders need to be used in conjunction with the draft so you weave with the right colors, in the right order, using the right treadles.
You can read more about warp and weft color orders here.
Getting the Full Picture
The three steps above describe what you’ll find in most published weaving drafts, and they include what you need to know to weave a project. They’re all missing one element that is part of a complete draft, though: the drawdown, which sits under the threading and to the left of the treadling.
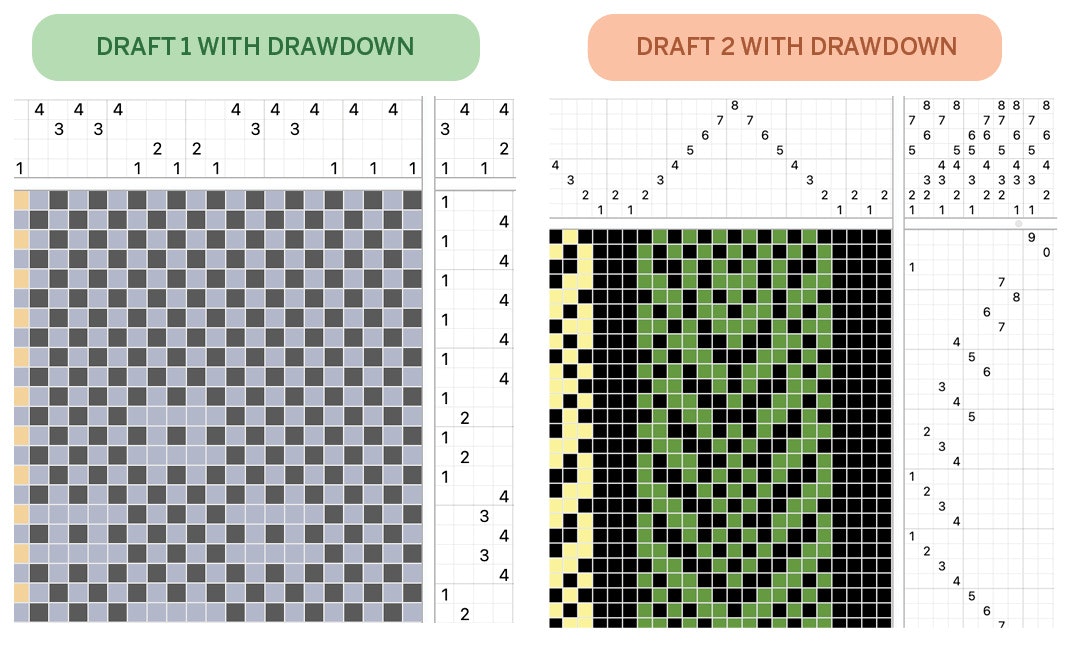
A drawdown is a graphic representation of how a draft’s tie-up, threading, and treadling work together; our four- and eight-shaft drafts complete with drawdowns are shown above (with colors added). You don’t generally need to see the drawdown to weave a draft, but it gives you a better overview of how the structure works.
With the help of graph paper, a pencil with eraser, and some focused time you can create a full draft with drawdown. Any weaving program or app will also let you open (or add) a draft and produce a full drawdown, and from there you can try out colors or experiment with treadlings or threadings before you launch on your next project.
If you’re curious about the projects shown in Draft 1 or Draft 2, you can download them from our library here:
Draft 1: Stormy Skies Towels & Wrap (free to download!)
Now that you understand what those rules, slashes, grids, and numbers mean, you can put that knowledge to work learning to weave on a multishaft loom. Take an in-person or online class, find a simple draft that appeals to you, and jump in!
Watch a free preview of a video course for beginners! Tom Knisely has a video course teaching Beginning Weaving, in which he covers the basics of multishaft looms, warping comfortably, planning a project using your chosen yarn, weaving tips and much more! Click the link to learn more.