Check out these fun ideas for sewing with small pieces of handwoven fabric! This article was the Idea Gallery in Handwoven September/October 2022 - Susan.
People’s attitudes to trying something new are akin to their approaches to a swimming pool. Some people dive right in, while others test the waters with a toe to decide if they want to go in farther, perhaps sitting on the edge for a bit thinking it over. Most of us probably go back and forth between the two approaches—I know I do.
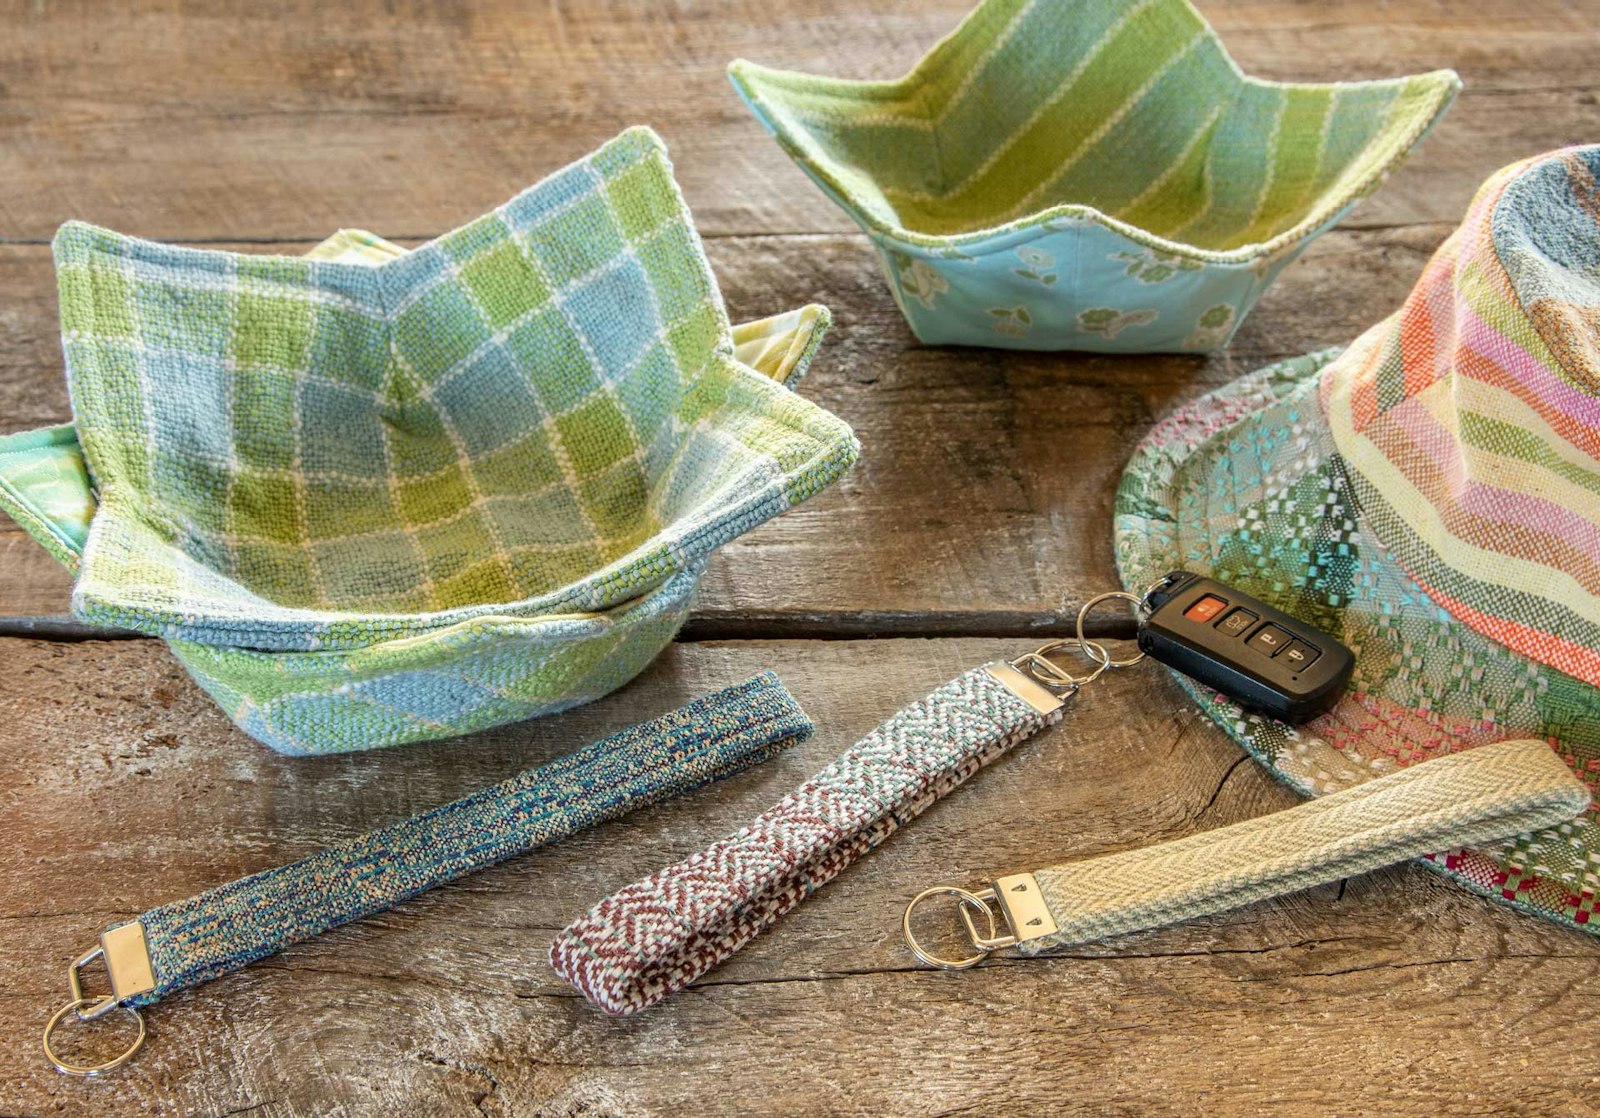
In this three-part Idea Gallery, I want to give the toe-dippers a safe place to enter the world of sewing with handwovens. All three projects can be made with handwoven scraps, thereby removing the angst that comes from the idea of cutting into your beautiful handwoven cloth. None of the projects require extraordinarily fine sewing skills, and all of them would be fun to own or gift. If you are looking longingly at the many projects in this issue but shaking your head, let this be the place you start—at your own pace—to learn about sewing with handwoven cloth by doing it. Sew a simple key fob using long thin scraps, a microwave bowl cozy with towel- or scarf-sized scraps, or a bucket hat using any number of scraps from past projects. Don’t let the splashers have all the fun.
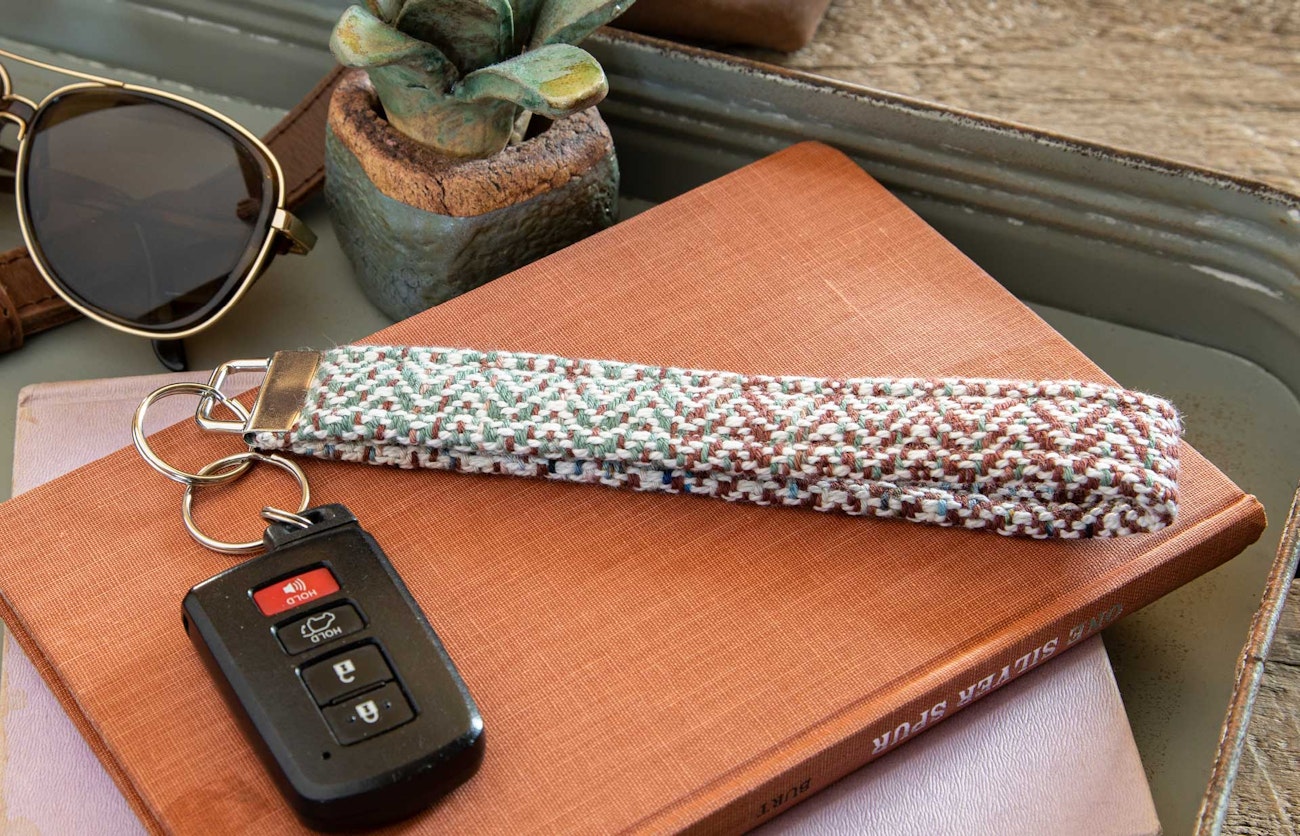
Key Fobs
By Chelsea Fremming
 Key Fobs by Chelsea Fremming
Materials and supplies
Handwoven fabric, 3" × 12"–14" (This is personal preference—you may wish to make longer or shorter fobs); fusible fleece interfacing, ¾" × length of handwoven fabric; matching thread; 1" metal key-fob hardware with key ring (see Resources).
Equipment Pliers (running or key-fob pliers recommended but slip-joint or needle-nose pliers will also work); large safety pin; pencil or other long stick; fabric, vinyl, or leather to protect key-fob hardware from pliers.
I love being able to make something beautiful and useful out of small pieces of my handwoven fabric. Handwoven key fobs are particularly easy to sew, making them great projects for beginners. These key fobs attach easily to keys or wristlet purses so you can keep your hands free and not have to fumble for your bag or keys while on the go. They also make great gifts.
There are multiple ways to make key fobs, but I have found one method to be the simplest and quickest and to create the sturdiest fobs. For dura-bility, I use fusible fleece interfacing that acts as a stabilizer and keeps the handwoven fabric from stretching. I prefer using a walking foot on my sewing machine because I find it makes sewing with handwoven fabrics easier. In addition, I often serge or zigzag the edges of my handwoven fabric to keep it from raveling; as with the walking foot, it isn’t necessary, but it can be helpful.
Sewing steps
1. Place the interfacing adhesive-side down on the wrong side of your fabric strip, centered along the length. Fuse the interfacing according to the manufacturer’s instructions.
2. With right sides together, fold the fabric lengthwise. Sew a ½" seam along the length, creating a long tube.
3. Press the seam allowances open with a hot iron. Turn the tube right side out by attaching a large safety pin to one end and feeding it through the tube. Insert a pencil or other long stick into the tube to ensure that the seam allowances remain open. This will help keep the fob flat.
4. Roll the tube to center the seam on the back, and using a hot iron, press the tube flat.
5. Topstitch along each side ¼" from the edge.
6. Bring the two ends together, one on top of the other, to create the wrist loop. Zigzag the ends together. Note: Sewing the two ends together will help keep them from slipping out of the key-fob hardware with use.
7. Push the zigzagged ends inside the key-fob hardware. Use fabric or a piece of vinyl or leather to protect the key fob, and press the two sides together with pliers, sandwiching the zigzagged ends inside securely.
8. Attach the key ring.
Resources
- Key-fob hardware and pliers. etsy.com/market/keyfobhardware.
CHELSEA FREMMING found weaving six years ago and happily dove into the deep end. With a background in sewing, she loves finding items to sew using her handwoven fabric.
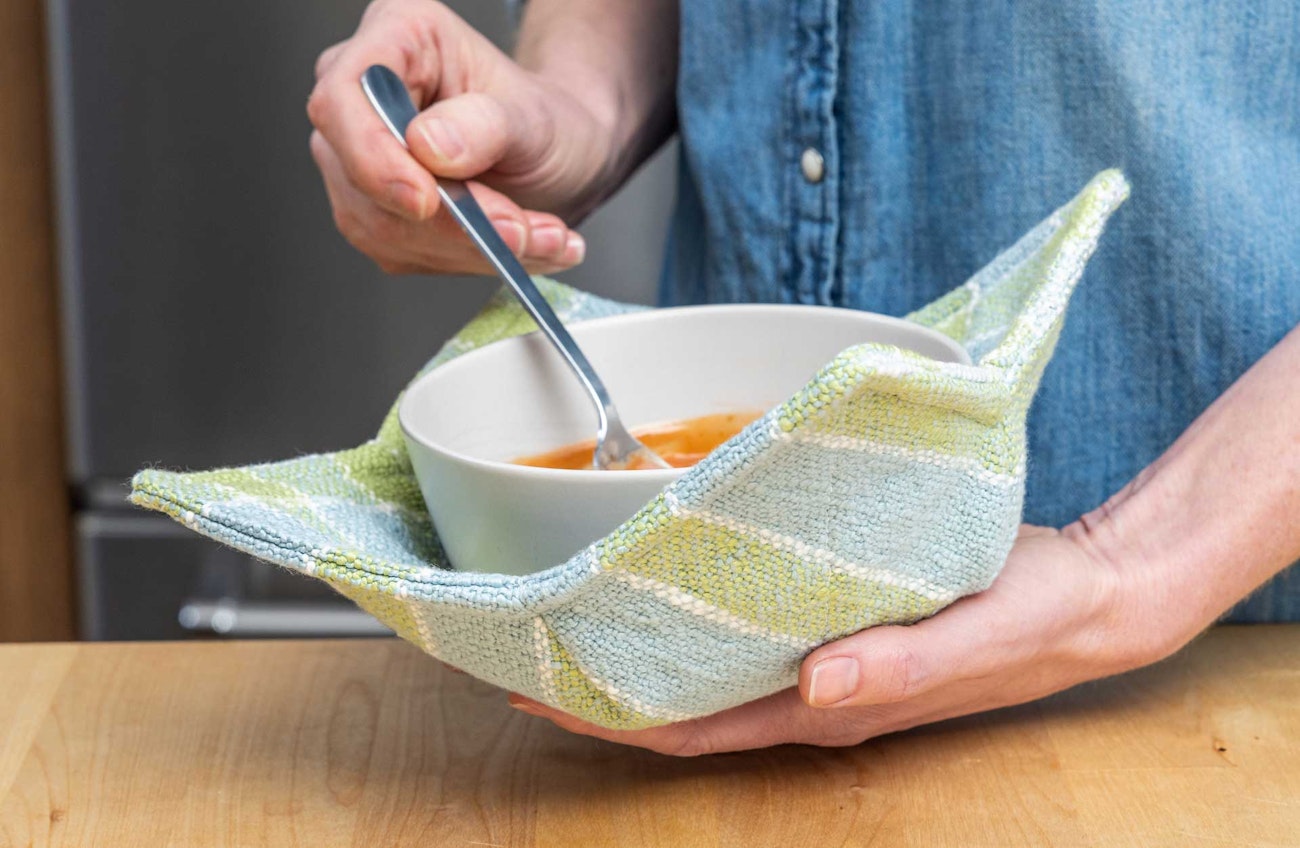
Microwave Bowl Cozies
By Susan E. Horton and Cathy Thorvaldsen
 Microwave Bowl Cozy by Susan E. Horton and Cathy Thorvaldsen. Photo by Julia Vandenoever
A casual conversation at a neighborhood party led to the two of us collaborating on this simple way to step into sewing with handwoven fabrics. Cathy was relating how she had gotten caught up in making microwave cozies and currently had a list of more than 40 people who wanted her to make them one. I was pondering simple for-the-home sewing projects that would incorporate handwoven fabrics. As we talked, I realized we could work together on this microwave cozy project, each of us doing what we do best.
After we met again to work out the details, I set about weaving plain-weave cotton fabrics on a rigid-heddle loom. I put on a striped warp that was wider than needed to allow for unforeseen shrinkage and give Cathy leeway in centering the pattern. For warp and weft, I used Mallo cotton from Gist Yarn, which I sett at 12 ends per inch and wove at 10 picks per inch. I wove two striped squares, using a different weft color for each, and then wove two windowpane-plaid versions tromp-as-writ, if you will, by simply using the same proportions of colors in my weft color order as my warp color order. After wet-finishing and pressing the fabric, I picked up coordinating fat quarters at my local quilt shop and delivered my portion of the project to Cathy.
For sewing, Cathy used the same pattern she had been using for the cozies made with commercial fabric (see Resources); other patterns can be found online and in quilt shops. Like many other sewists before her, she was a bit hesitant about cutting into the handwoven fabric but gained confidence by first stabilizing it with fusible interfacing and then stitching around the edges to prevent fraying. Two of the cozies combine handwoven and quilting cotton, and one is a combination of striped and plaid handwoven fabrics. Cozy sewing patterns can be upsized or downsized to fit other vessels, such as cups or serving bowls. Made in a favorite sports team’s colors or for a special occasion, they make great gifts.
Tips for sewing Cozies
- Handwoven fabric can be a bit bulkier than commercial cottons, so Cathy recommends using only one piece of batting inside the cozies rather than the two called for in the pattern.
- To keep your edges smooth and clean, clip the corners and the dart curves.
- For cozies that will be going in the microwave, the pattern maker specifies using only cotton thread, interfacing, batting, and fabric, which is what Cathy does.
- A line of topstitching around the top of the cozy gives the edge added stability.
Resources
- The Broken Needle. YouTube. youtube.com/c/TheBrokenNeedle.
- Microwave bowl cozies sewing pattern. anniescatalog.com.
CATHY THORVALDSEN is a full-time homemaker and mom to two Australian shepherds. In addition to sewing and crafting, she enjoys cooking, gardening, and reading.
SUSAN E. HORTON is the editor of Handwoven, an enthusiast of all types of weaving and fiber arts, and most recently happy to be a gramma.
Scrap Bucket Hat
By Rebecca Fox
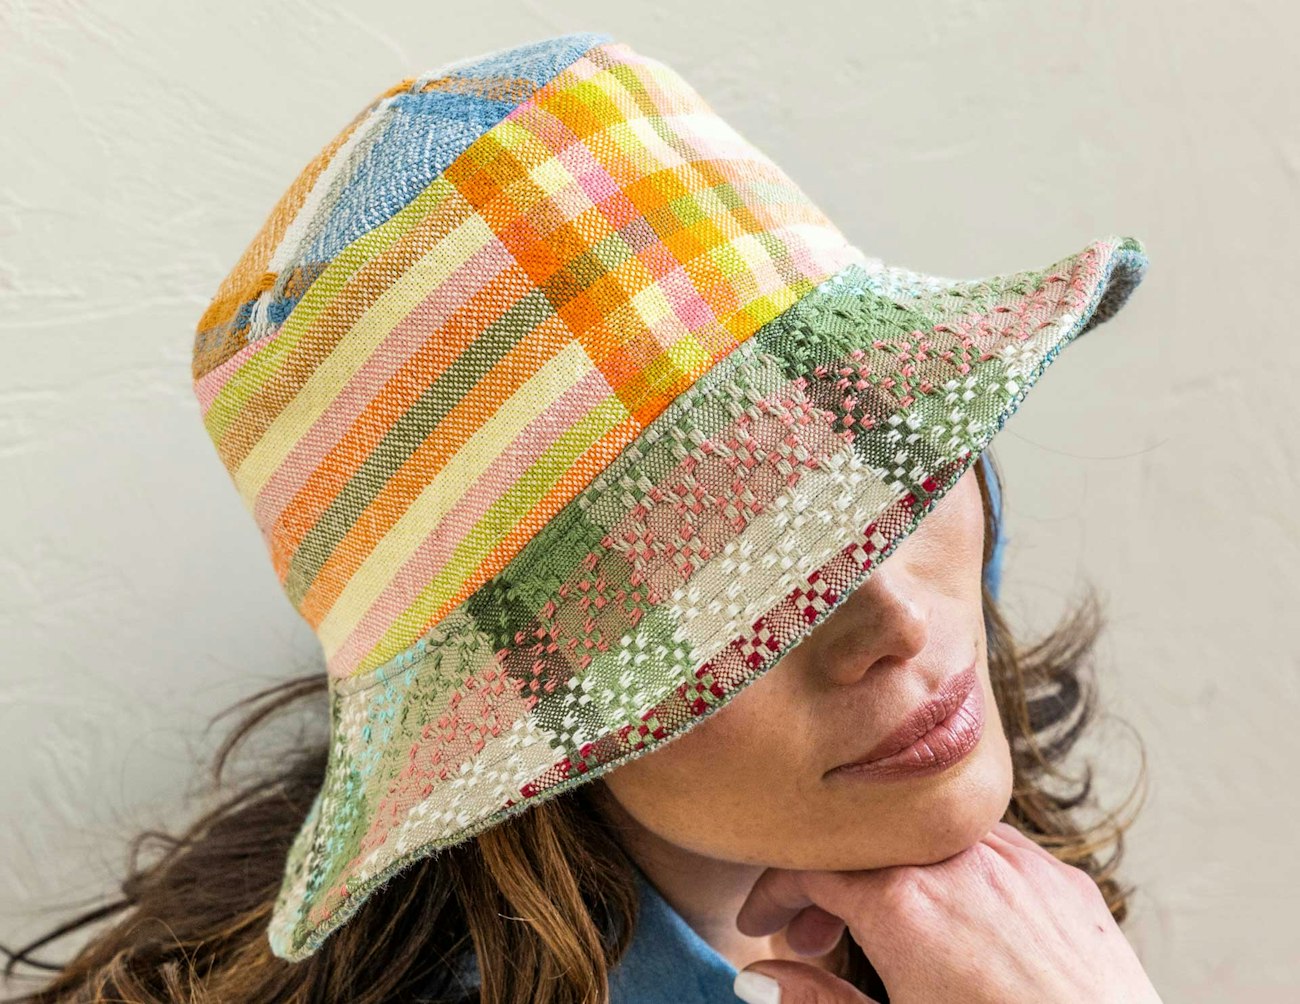 Rebecca Fox's Scrap Bucket Hat. Photo by Julia Vandenoever
Many weavers are supreme collectors. They amass yarn, tools, books, magazines, and, of course, they save handwoven fabric. I’m part of the collectors’ group. Because I am deeply involved with every aspect of my handwovens, I carefully categorize and store every bit, no matter how small. I even save pieces that were woven by others in study-group exchanges. I have notebooks filled with handwoven samples from workshops, and all pieces of precious handwoven, no matter how small, are stored in my inventory (i.e., a cardboard box), just waiting for inspiration. After being a weaver for nigh on 40 years, I have a lot of fabric.
Part of the USA Summer Olympics 2020 uniform (designed by Ralph Lauren) was a bucket hat. This hat garnered mixed reviews from the Olympians themselves, with positive (and less positive) reviews posted on social media platforms; some were hilarious. Around the same time, I happened to find a free bucket-hat pattern offered on the Mood Fabrics Sewciety blog. And that got me wondering what this hat would look like using handwoven fabric rather than a commercially sourced material. This was a light-bulb moment!
I have now made several hats from my extensive catalog of fabric.
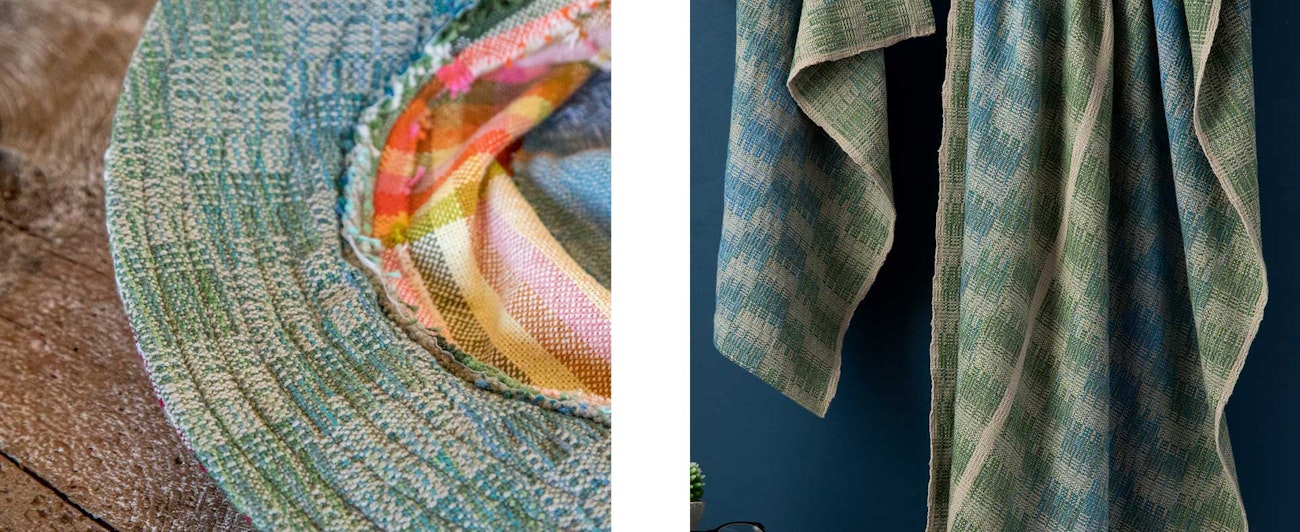 Rebecca used leftover fabric from her Coastal Crackle Towels featured in Handwoven, January/February 2022, for the underside of her hat’s brim.
Tips for sewing scrappy hats
- Even though the hat pattern shows a grain line, all the pieces are curved, and I have not found it important to keep the pattern square to the grain. Instead, I place the pattern pieces on my swatches so that I minimize waste.
- Generally, there is no need to sew or overlock the edges because they do not tend to fray easily. I have found that cotton or wool fabrics work extremely well. Slippery fabrics are a little trickier to work with but can still be used.
- Take care to match the seams on the brim with the side-panel seams (although you can rip the seams and resew). Use the same sewing thread for all the seams or mix and match thread colors, depending on the color of the fabric you are using.
- If you have a large piece of handwoven fabric, you could certainly make a hat in one pattern or color. However, I happen to like using multiple fabrics to create a one-of-a-kind item. In the version pictured here, I used four fabrics, not all in the same color family. For an even more eccentric look, you could use a different fabric for each of the seven pattern pieces, and you could even sew small swatches together to create larger pieces of fabric.
- If you combine handwoven and commercial fabrics in the same hat, make sure the commercial fabric is of similar weight to your handwoven. Use caution if mixing a heavier-weight fabric with a lighter-weight material in the same piece; experiment with the combination first.
- Two options that I’m considering trying are adding wide elastic on the inside of the brim and side panels to get a snug fit, and possibly adding grommets to the side panels, although, come to think of it, using a lace structure there would add built-in ventilation!
- This hat pattern has eight sizes to fit toddlers to extra-large adults, allowing everyone on your gift list to benefit from your treasure trove of handwoven gems.
This pattern does not have a difficulty rating. I consider myself a moderately experienced but nervous seamstress. I found the directions clear and easy to follow. My advice is to take your time and enjoy the process to avoid making mistakes.
I hope to see many bucket hats posted in my weaving and sewing social media groups. I cannot wait to see what you come up with!
Resources
- Bucket hat sewing pattern. moodfabrics.com/blog/the-bucket-hat-free-sewing-pattern.
- Rebecca wove each of the fabrics used in the hat; all were left over from projects published in Handwoven.
- Crown: Su Butler. “Go International: Join a Worldwide Napkin Exchange!” Handwoven, May/June 2010, 58–59 (Rebecca’s napkin is the second napkin listed).
- Side panels: Rebecca Fox. “Fresh Citrus Napkins and Tablecloth.” Handwoven, May/June 2014, 44–46.
- Top side of brim: Rebecca Fox. “Bouncing Baby Circles.” Handwoven, November/December 2019, 22–24.
- Underside of brim: Rebecca Fox. “Coastal Crackle.” Handwoven, January/February 2022, 62–65.
REBECCA FOX enjoys weaving with many colors and is now inspired by her coastal South Carolina home.