Here is the third in our series about the main types of weaving shuttles. You can find the first part, about stick, belt, netting, and rag shuttles, here, and the second part, about rug and ski shuttles, here. —Susan
As with the shuttle types I covered earlier in this series, boat shuttles come in many variations, each variation suited to a specific function. Boat shuttles are used with bobbins and quills, so I’ll also write a little about those, and the best methods for winding them.
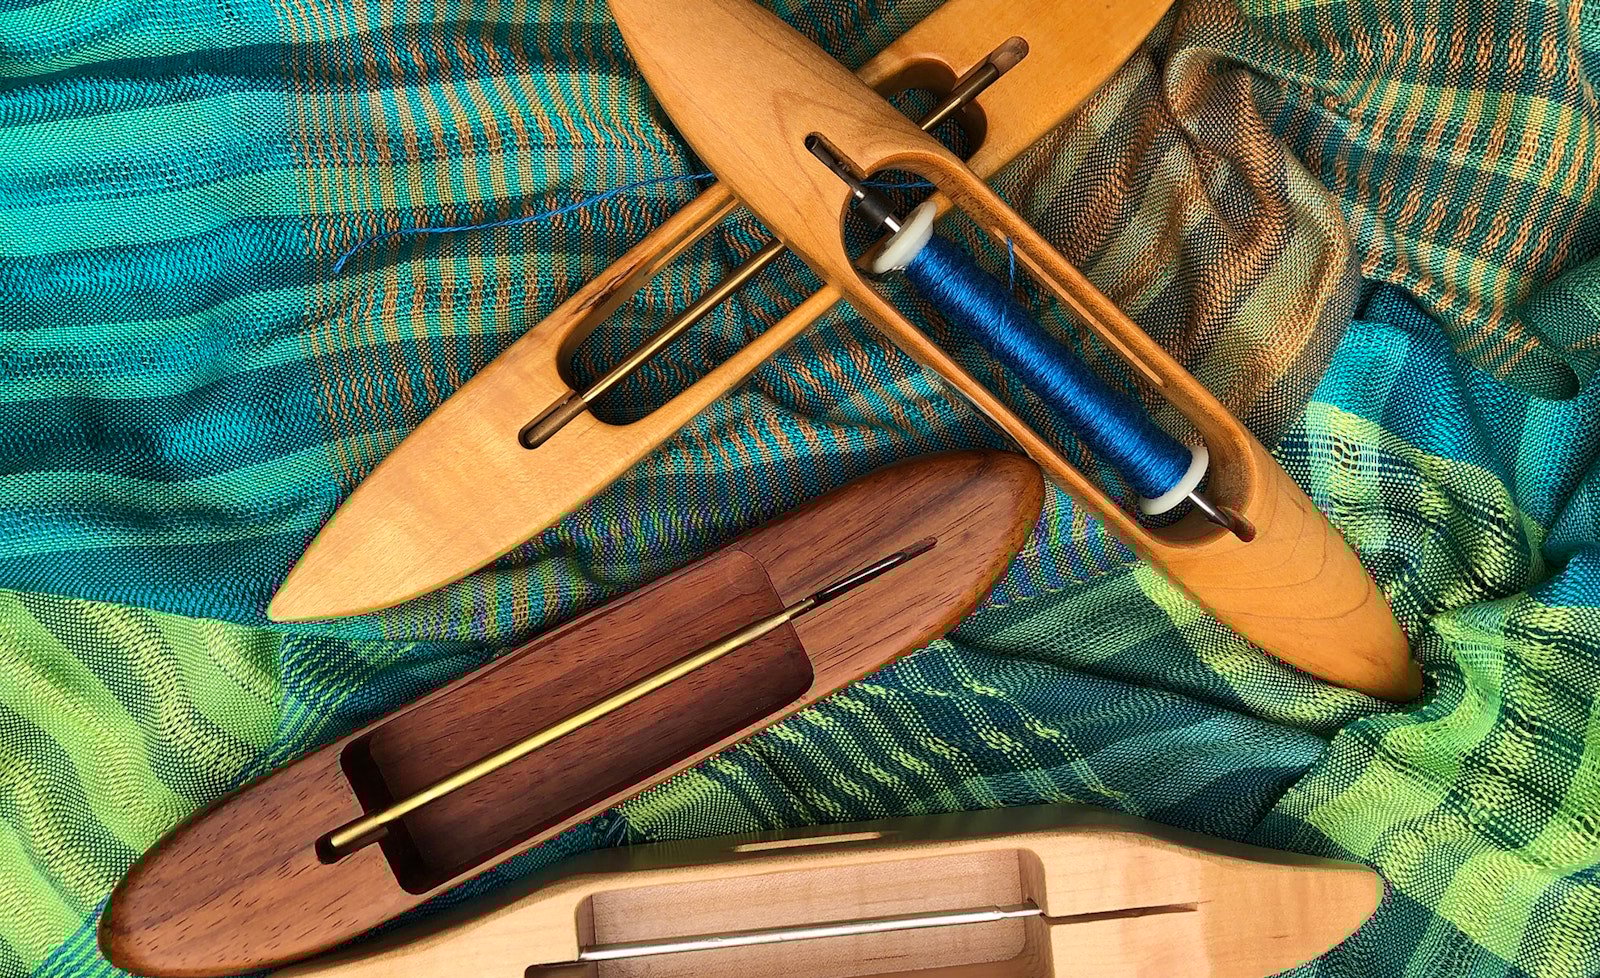
Boat shuttles generally come in lengths of 8"–13" and accommodate a 4" bobbin, although some longer models can hold a 7" bobbin. True to their name, boat shuttles look like boats with tapered ends and a middle depression, known as a box, that holds a bobbin, bobbins, or quills. Boat shuttles generally have a slight upward or forward curve to facilitate entry into and exit out of the shed. They are ergonomically friendly for long periods of weaving.
Closed bottom boat shuttles have a solid bottom of wood that enhances the glide of the shuttle across the warp and shuttle race. Some even have a slight depression at the bottom to lessen friction.
Open bottom boat shuttles weigh slightly less than closed bottom shuttles, although the difference is negligible. Winding your bobbins correctly and not overloading them is important when using an open bottom shuttle, as protruding weft will inhibit the shuttle’s glide across the warp.

Swedish shuttles are slim and lightweight.
Swedish boat shuttles are slim, lightweight, and primarily used for weaving linen on wide warps. They work well for the extremely low and tight sheds sometimes found on draw looms, and for weaving on a split sheds or opphamta. This type of boat shuttle uses a quill rather than a bobbin.
Almost any boat shuttle will work for you and your weaving style, so long as you maintain well-wound bobbins and quills, so let’s focus on that aspect.
Bobbins
Bobbins come in plastic, wood, and metal, and are 4" or 7" long. You’ll want to make certain that your bobbin has a minimum of ½" of “play” on each end of the spindle, because it needs to move from side to side as you throw the shuttle. It’s not wise to try to fill that void with rubber bumpers or beads, which will hamper the side-to-side movement.
When winding a bobbin, aim for even and firm tension and a horizontal build from right to left and back again, until you have a slightly rounded hump in the middle. Wind moving the weft quickly from side to side so that the threads aren’t parallel to each other on the bobbin, which can cause them to catch.
If you generally weave with 8/2 size yarns or thinner, you will be able to wind a good amount onto a bobbin—but you should resist the impulse to overwind weft of any size. An oversized hump in the middle will drag on the bottom of a closed shuttle, impeding the smooth unreeling of weft, or it will fall “below deck“ on an open shuttle, inhibiting the shuttle’s glide.
Some plastic bobbins have built-in bumpers on each side to keep weft from slopping over. If your bobbins don't have bumpers, wind on humps at both sides before you fill in the middle.
TIP: A good general rule of thumb for snag-free weft reel-out: If your shuttle’s spindle is slightly higher than the slot, insert your bobbin with the weft winding off from below. If the spindle is slightly below the slot, place your bobbin in your shuttle so that it winds off from the top.
If you are experiencing loops at your selvedges, try throwing your shuttle faster, which will impart just a bit more tension at the selvedge. Also, use your thumb or forefinger to catch the bobbin as it exits the shed, thus preventing that “zing” factor where your bobbin continues to unwind after the shuttle has stopped.
If you live in a dry climate or experience static electricity with your weft, try inserting a piece of fuzzy cloth in the bottom of a closed-bottom shuttle. You might even dampen the cloth slightly with water to “soften” stiff and wiry linen yarns as the weft draws out. This creates a “microclimate” of humidity inside the shuttle box.
A slim spool of thread can be used in place of a bobbin, a timesaver when you’re weaving with sewing thread for the hems of kitchen towels and the like. If you don’t like the spool rattling around on the spindle, add more spools on either side of it—but not so many that the weft spool can’t turn freely.
Quills
You can purchase either plastic or hardened cardboard quills. You can also easily make your own for use in Swedish boat shuttles, or in any shuttle that takes a bobbin.
If you have a bobbin winder with a spindle, simply wind a 5" x 5" piece of paper onto the spindle to make a tube, seal with tape, and trim to length. Be sure to use paper that results in a sturdy quill that will be a rigid base for your weft.

Use a straw on a two-ended winder as the base for your quills.
If you have a double-ended winder, as I do, you can use a plastic straw as a base and wind the paper around the straw in the same manner. I wind starting on a corner and use a tab of scotch tape to attach that corner to the straw first. The straw gives better support to my style of electric winder.

A completed quill
Fill the quill as you would a bobbin, moving from side to side, with each pass becoming narrower until you have a well-rounded center hump. If you aren’t paying attention and make a ridge somewhere along the way, unwind and start again. The ridge will snag your reel-out and you’ll be left with messy selvedges.
Weight and Size
The closed bottom shuttles in the photo at the top weigh 5.75 oz and the open bottom shuttles weigh about 4.1 oz. They are all about 12" long. The weight difference probably results more from the wood used rather than the shuttle structure. That slight variation in weight also probably won’t affect you, but you may find you prefer one over the other.

Take shuttle height into account when choosing shuttles.
Shuttle height is another aspect to consider. One of the shuttles shown above has a low profile of less than 1", while the other has a standard profile of 1½". The difference in these two shuttles’ circumference is about 1", which might make one or the other more appealing to you depending on your hand size. If your loom has tight sheds, that may also be a factor in your decision about shuttle height.
The Swedish shuttle is longer than the others at 18", yet it is only ½” high and weighs only 3.9 oz. Some Swedish shuttles have weights embedded in the wood to facilitate shooting them across a wide warp. Swedish shuttles are a dream to use, but they can be awkward for narrow warps where you’d need to hand the shuttle through the shed, compromising both speed and good selvedges.
If you’re in the market for a new shuttle, my recommendation is to borrow one from a friend or visit a weaving shop, sit at a loom, and simply throw the shuttle as many times as you have the patience for. You’ll discover soon enough which shuttle works for you—and you may even want more than one type, depending on the kinds of weaving you do.
My next shuttle post will cover specialty shuttles, such as double-bobbin, end-feed, and fly. Do you have questions about shuttles? Please send them to [email protected].
Originally published December 4, 2020; updated June 17, 2024.