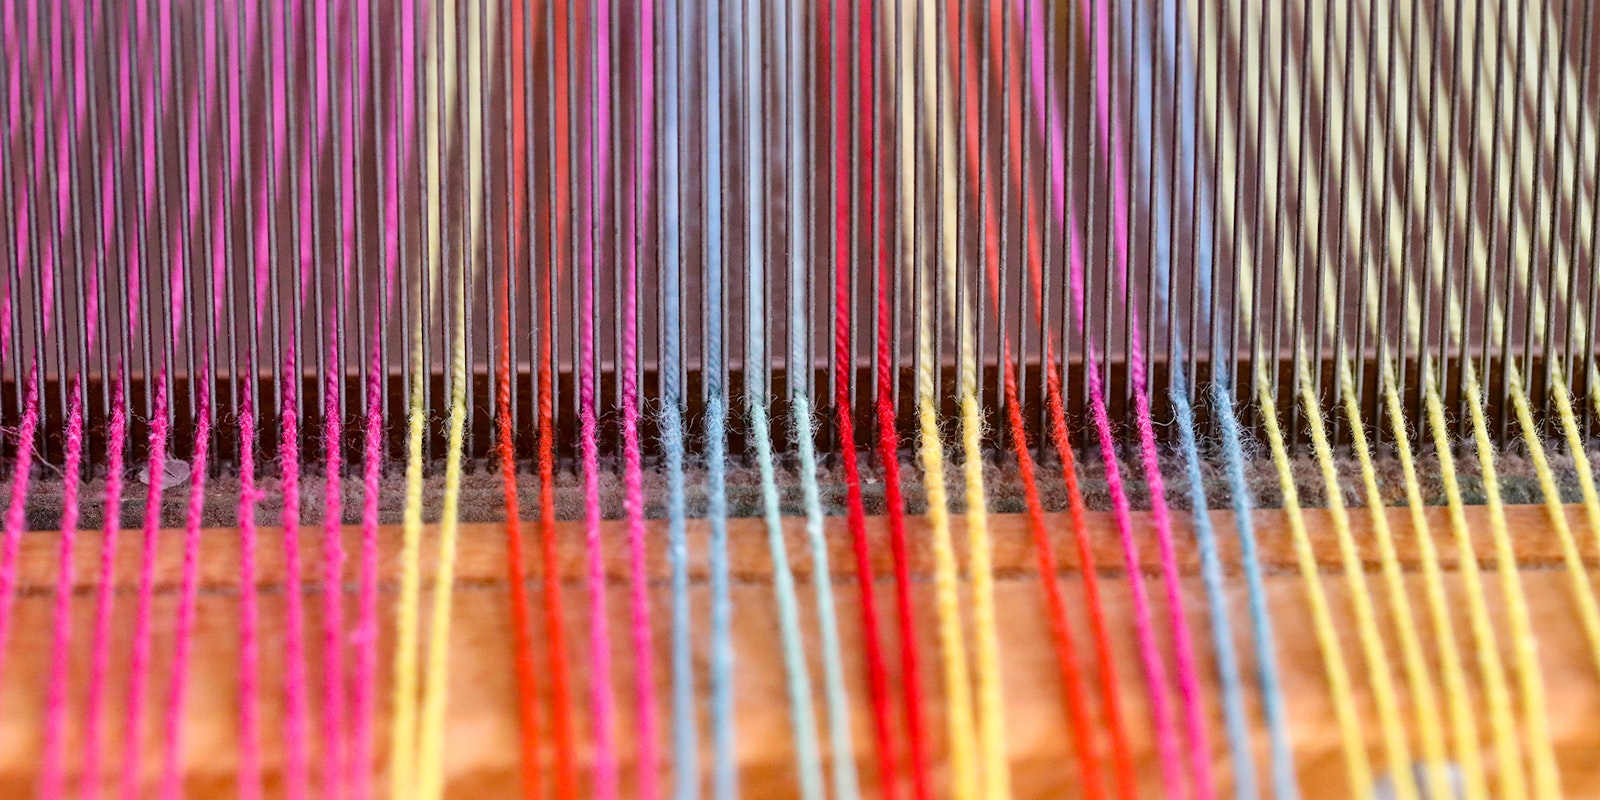
I learned to weave at Guilford Art Center. I had great teachers, my fellow students were fun and engaged, we had a full cabinet of Handwovens and other weaving literature to paw through and all sorts of looms to try. The weaving studio was in a town where one of my best friends lives, which meant lunch and coffee dates. Perfect.
Since then, I’ve learned how lucky I was to have ready access to weaving information and instruction. Where do you turn when you have questions? That’s why during the pandemic, Susan Bateman, the owner of Yarn Barn of Kansas contacted me about doing a series of five articles called “Best Practices” for Handwoven that could become a resource for beginners as well as a refresher course for intermediate weavers. Over the course of many years, she and other teachers at the Yarn Barn had noticed that the same questions kept coming up. Having taught weaving myself, I knew just what she was talking about, plus, I remembered being a student and wondering about some of the same things.
Here’s a excerpt from the article where Susan and Melissa Parson dive into interpreting drafts. This information is great for beginners, but even experienced weavers might appreciate a refresh and pick up a tip or two.
Best Practices: Interpreting Drafts
 The bracketing on this draft might be confusing at first, but it’s quite easy to read once you know how.
The weaving draft is a clever way of giving a weaver a lot of important information in a compact format. The L-shaped threading, tie-up, and treadling draft is the standard for most modern weaving projects, but even within this familiar shape, there can be many differences. As such, it’s important when encountering a new draft to orient yourself. The “L” can be rotated in many directions: regular, backward L (Figure 1), upside down L, or upside down and backward L. Regardless of orientation, the horizontal section is always the threading portion, and the vertical section is always the treadling. Where the two intersect, you’ll find the tie-up.
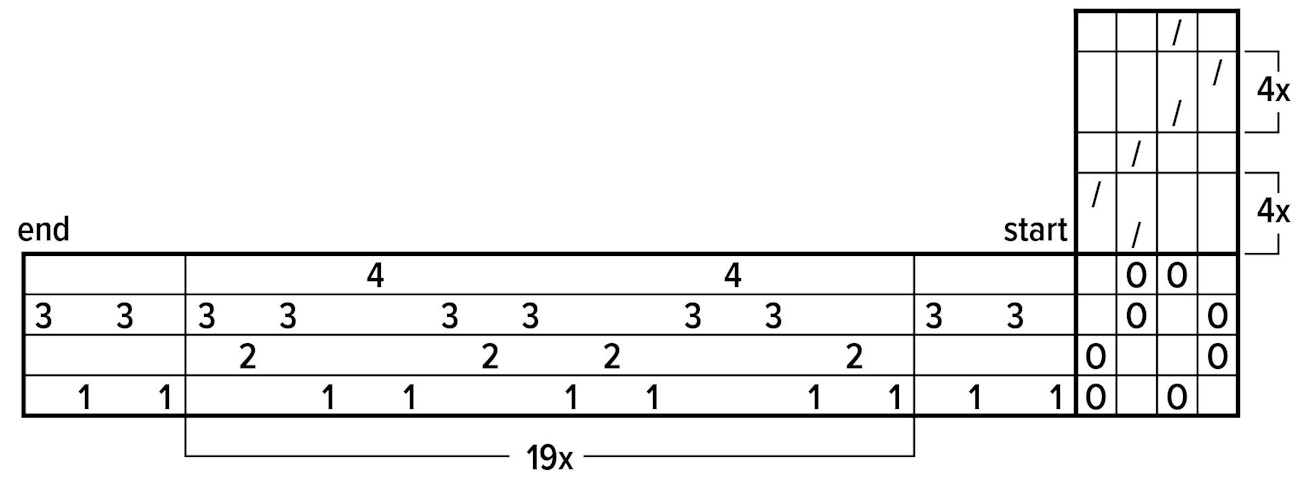
Figure 1. This draft is based on the format used by Weaver’s Craft. It shows the tie-up at the bottom right.
Threading
A draft may look abstract, but if you lay it flat on the top of the loom’s castle, the draft is a direct map of what is happening in the heddles below. The horizontal rows that make up the threading portion of the draft represent the shafts. The bottom row is the shaft closest to you when you are sitting at the loom, and the top row is the farthest shaft.
A mark in the threading draft represents a warp end that goes through a heddle on that shaft at that location. The mark may be a square, a dot, a hash mark, or a number representing the shaft you’ll thread it on. Different thicknesses of yarn, textures, or yarn colors may be indicated by various symbols in the draft. Check for a legend adjacent to the draft that defines the symbols.
Tie-up
The tie-up explains how the shafts are lifted. As in the threading portion of the draft, the bottom horizontal row represents the front shaft, and the upper row represents the back. The vertical columns represent treadles. The leftmost column of squares represents the leftmost treadle, and the rightmost column represents the rightmost treadle.
Each square of the tie-up represents a possible connection between a shaft and a treadle. On a floor loom with lamms that are connected to the shafts, you connect the treadles to the lamms with cords, chains, or hooks. The marks in the squares may look different depending on the type of loom the draft is written for, the style of the publication the draft is found in, or the weaver who created it. The generally accepted convention is that when the grid is filled with numbers or O-shaped marks, those marks indicate shafts that are lifted, as on a jack loom or rising-shed loom. X-shaped marks are used for shafts that aren’t lifted and instead are lowered. Those are found on countermarch and counterbalance looms, commonly called sinking-shed looms.
Always consider the source of the draft. Solid black squares in the grid of a computer-generated draft (Figure 2) mean shafts that rise; however, in old Scandinavian drafts, they meant sinking shafts. A draft written for a sinking-shed loom will still work on a rising-shed loom if you connect to shafts that lift, but the “right” side of the fabric as written will be facing down as you weave, and the left and right elements of the design could be reversed when you turn the fabric over. The same is true if you use a draft written for a rising-shed loom on a sinking-shed loom.
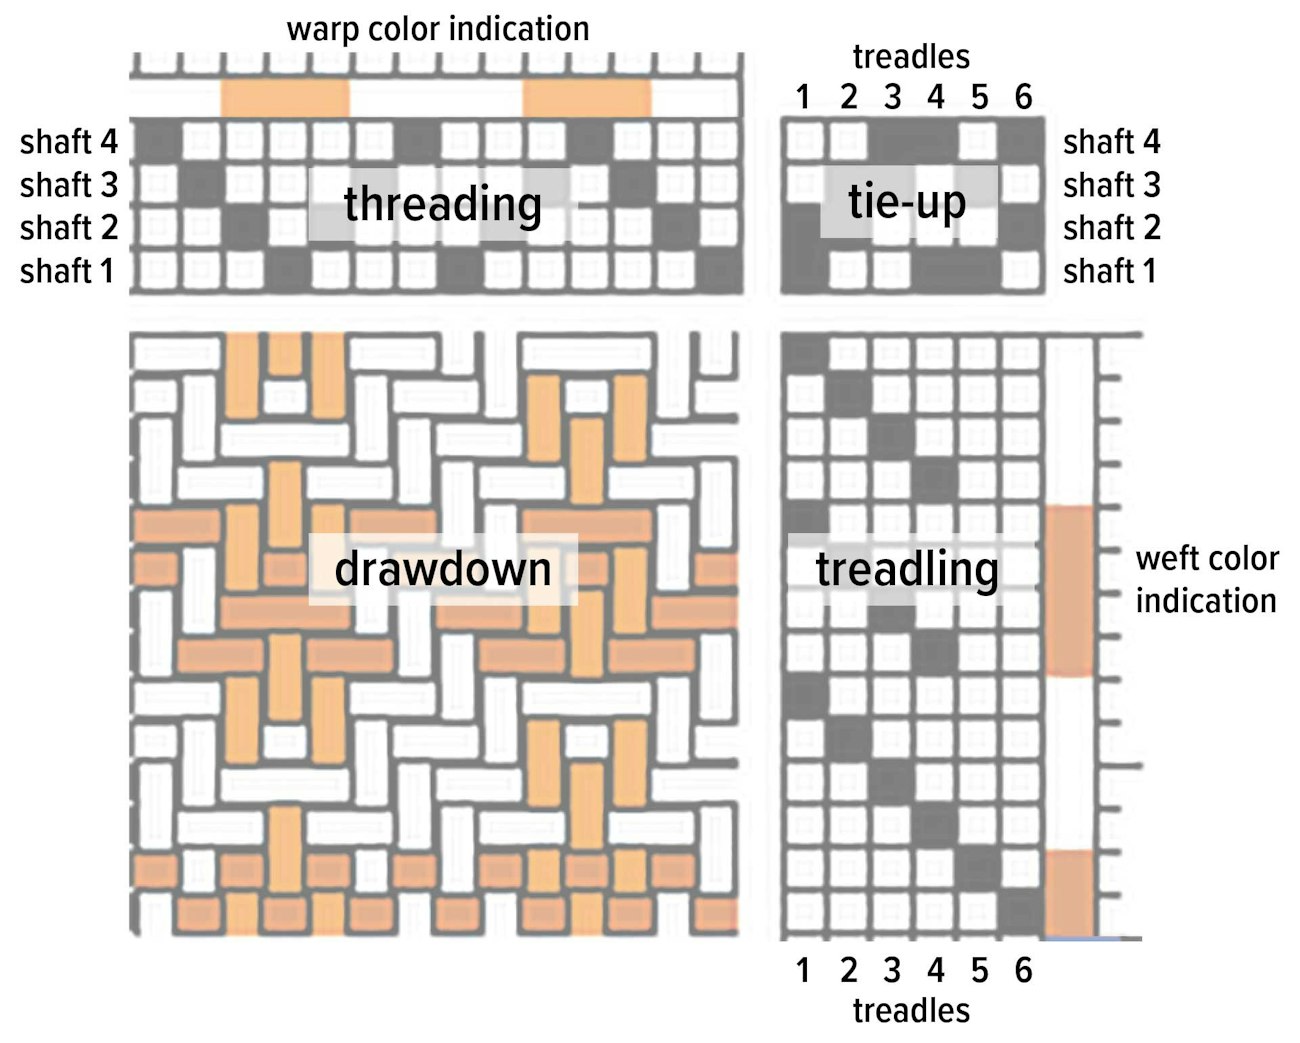
Figure 2. This is a drawdown generated by Fiberworks PCW software with the parts of the draft labeled.
If you have a loom with direct tie-up or a table loom, use the tie-up to determine which treadles to step on or levers to flip. For each weft pick, follow a straight line up or down to the tie-up box. Raise (or lower) the shafts marked within that column in the tie-up.
Treadling
Like the tie-up, the vertical columns in the treadling portion of the chart indicate the treadles under the loom. The treadling can be read top to bottom or bottom to top. Unless directed otherwise in the reference that contains the draft, start with the treadling directly above or below the tie-up.
Although lines dividing the treadling sequence into rows might not be printed on the draft, imagining such dividing lines would show you that each mark on the drafts we’ve shown is in its own “row.” Each row in the treadling chart and corresponding drawdown (if one is present) represents one pick of weft. If multiple colors are used as weft, they may be indicated by colored squares to the side of the treadling sequence, or the mark for the pick may indicate the color.
Bracketing
Bracketing is used to compress drafts. Sequences that are repeated multiple times in the same way are shown only once, with an indication to repeat a specific number of times. The draft at the top of this article looks complex, but once you know its rules, you can easily interpret it. Let’s break down the bracketing.
When threading, use the tie-up as your starting point. Because our tie-up is in the upper right, we’ll be reading this draft from right to left. You’ll see that the draft is divided into groupings that are labeled “3x” and “4x” at different heights. As you move from right to left, you’ll deal with the brackets as you come to them, but it is good to keep in mind that the larger repeats are represented by the upper brackets. Our sample has two levels of bracketing, but more are possible in more complex drafts.
The floating selvedge is the first warp end that you encounter when threading this project, and it is not threaded through any heddle. Its symbol is the dot that is below the draft. The floating selvedge is not within any brackets and thus not repeated.
The first warp end through a heddle goes through a heddle on shaft 1, followed by ends on shafts 2, 3, and 4. This group is enclosed by a bracket labeled “4x” so you will repeat this sequence four times total. This means threading the shafts in this order: 1-2-3-4-1-2-3-4-1-2-3-4-1-2-3-4.
Once you have completed threading the first four repeats, you will move to the left. The next five ends are not under a lower-level bracket, so you thread the sequence just once: 3-2-1-2-3. The next four ends are under the “4x” bracket, so you repeat that sequence four times. The next group of five ends is threaded once only, 2-3-4-3-2.
You have now reached the end of what is enclosed in the upper “3x” bracket. The “3x” tells you to repeat the entire sequence that you have just threaded for three repeats total. To do so, go back to the rightmost end under the “3x” bracket and start again with the 1-2-3-4 sequence that is repeated four times. Repeat the entire sequence under the upper-level “3x” bracket two more times, for a total of three times.
When you have finished threading under the “3x” upper-level bracket, continue moving to the left, threading 1-2-3-4 four times, 3-2-1-2-3 one time, and 4-3-2-1 four times.
The final end in your warp is the floating selvedge, which, like the first one, does not go through a heddle.
Bracketing on the treadling sequence follows the same rules as in the threading. Treadling typically starts at the tie-up box and reads downward. In our example, you begin with a pair of picks that are treadled 1-2 twice, and then begin the repeat. This is a 14-pick repeat that begins on treadle 6 and ends on treadle 5. It is labeled simply “repeat” without a specific number because the number of repeats is not fixed. For this example, let’s say that the text tells you to weave the repeat for 65 inches. Once finished with the 65 inches, you would continue reading downward on the draft, throwing a single pick on treadle 6 and then the last four picks in the “2x” bracket.
More on the Best Practices Series
If you are a Handwoven All Access subscriber, log in below and download the PDF of WEAVING BEST PRACTICES COLLECTION: Essential Skills and Problem Solving for Better Weaving by Susan Bateman and Melissa Parsons. You can get all five articles, including the rest of their article on interpreting drafts.
Here is some of what you will learn:
#1 Winding a Warp: As a beginner, I struggled with making and keeping the porrey cross, that important feature of a warp that prevents you from having a total mess on your hands when you take it off the warping board. It’s simple once you get it, and Susan and Melissa help you get it with pictures and steps.
#2 Threading and Sleying: It’s tempting to just jump in and start sleying or threading, but if you fully prep your loom for a warp as described, you will have a better experience and possibly better outcomes.
#3 Winding on and Tensioning a Warp: Often it feels like weaving instructions assume you have someone to help you wind on and tension. Really? I am usually by myself, so I appreciated the tips about how to keep things smooth...and I have been weaving for more than 25 years!
#4 Fixing Mistakes: Most beginners don’t realize that almost all errors are fixable when you are still on the loom, and many can be fixed off the loom. Weaving is gentle that way. This segment describes common errors and offers solutions.
#5 Interpreting Drafts: Drafts come in many forms besides what you see in Handwoven. Susan and Melissa describe the variations and how to decipher them in this segment. Using their tips, you could open a weaving book in any foreign language and fully understand the drafts.