The ways in which weavers can show their personal styles are endless. Many weaving techniques allow the weaver to add personal touches and accents that make every piece a one-of-a-kind work of art. However, some techniques are more daunting than others, and it seems that for one reason or another, hand-dyeing warps falls into that category.
I understand the unease around dyeing warps, but the results are well worth overcoming any hesitations. Dyeing warps can be a little messy, and it takes some time to learn the process, but my hope is that by the end of this article, you will see it isn’t quite as overwhelming as you might think.
To illustrate my process, I prepped, dyed, and wove a wide shawl, but a narrow scarf would be a great beginner project. For my shawl, I wound a warp of 720 ends 3½ meters long (about 3¾ yards) using 5/2 Tencel from Green Grass Handwoven (see Resources). I wound 10 separate warp sections of 72 ends each. For the type of dyeing I do, it is essential to use a cellulose fiber, such as Tencel, rayon, cotton, or linen. Tencel is my go-to fiber for shawl warps because I like its shine, and the finished drape is soft and elegant. It’s also durable and soaks up dye better than other cellulose fibers I’ve worked with. My finished shawl is about 2 meters (a little less than 2¼ yards) long with 6-inch fringe; the rest of the warp length is for loom waste and take-up. It’s a bit long, but I like to err on the side of too long rather than too short. After winding, I chained my warp sections loosely to allow the dye to fully saturate the yarn.
Before going any further, there are some safety rules you should be aware of; for more detailed dye safety information, see Resources.
1 Don’t use any utensils or pots that you use for cooking or eating. Dyeing equipment should always be kept separate.
2 Don’t eat or drink in the dye area.
3 When working with powdered dyes and soda ash, wear goggles and a face mask that covers your nose and mouth.
4 Wear rubber gloves and an apron. Don’t put your hands in the dyepot without the protection of gloves. At the end of a dye session, your hands shouldn’t be the color of the dyes.
After I wound the warp chains, I picked my dye colors from the selection of Fiber Reactive Procion dyes on Dharma Trading Company’s website (see Resources). Most of the time I don’t hold back on my color selections—I like a lot of color. For this shawl, I used this issue’s color palette as a guide.

Hand-dyed chains ready for the loom.
For your own shawl or scarf, pick out the dye colors you feel best match your chosen colorway. While you are at it, purchase some soda ash fixer. You’ll also need two plastic drop cloths, rubber gloves and an apron, sturdy mixing bowls, a set of tablespoons and teaspoons, a fork or spoon for mixing, and 2-inch foam paintbrushes—one for every color. I work on a large table that I can drape with drop cloths.

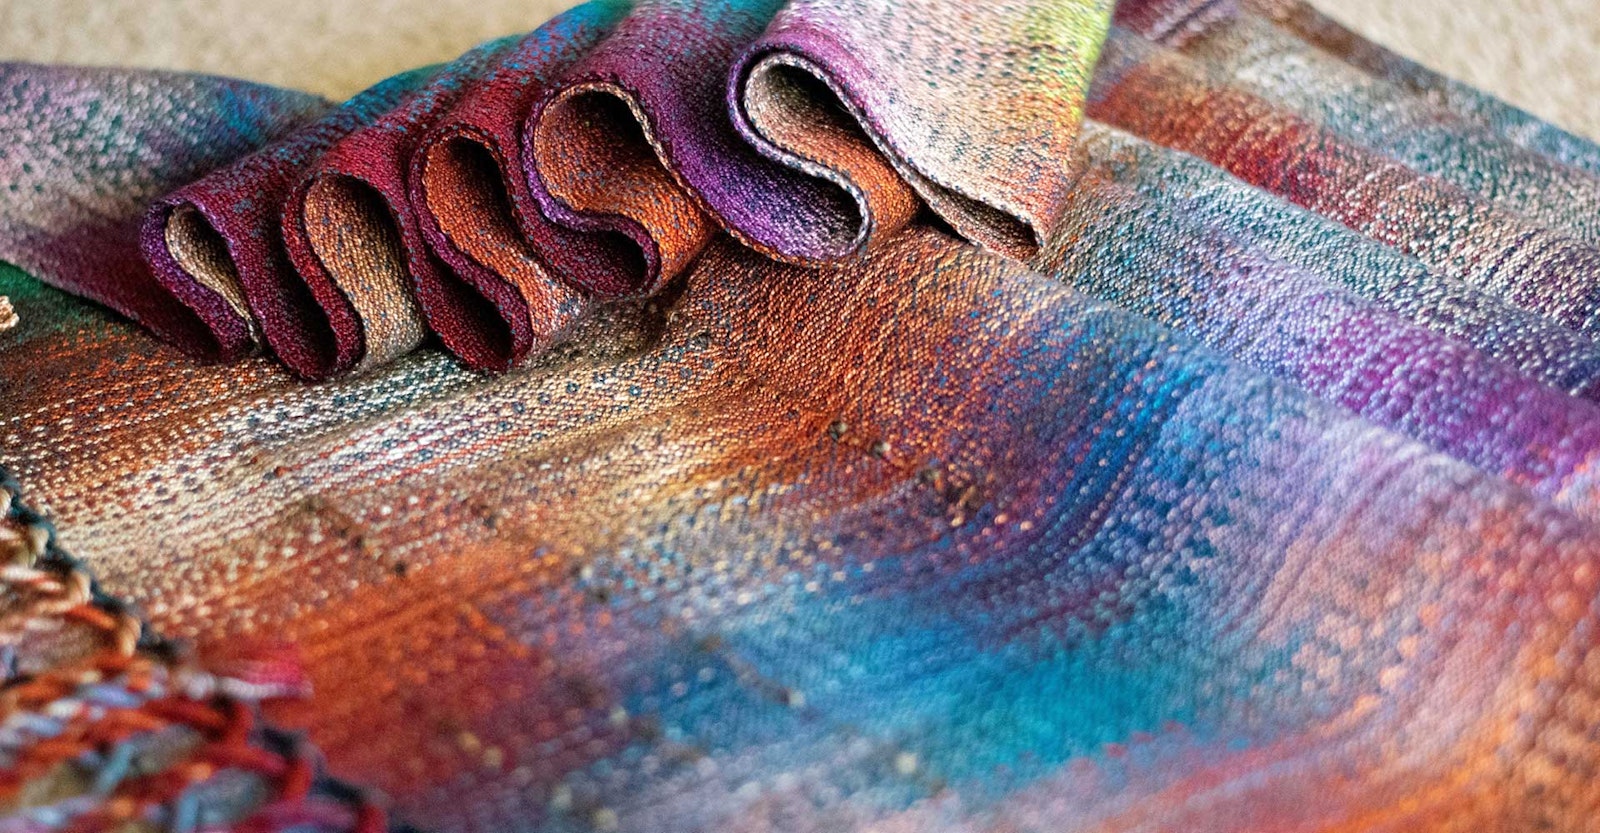
Left: Samantha’s finished hand-dyed warp shawl with inlays. Right: After you have wound your chains, it’s time to start assembling your dye area.
With warp chains and dyeing supplies on hand, the fun begins, but first glove up and put on your mask, goggles, and apron. Start by prepping the soda ash presoak with a ratio of about 1 cup soda ash per gallon of water. (The amount of presoak mixture you need will depend on the size of your warp.) If you are dyeing Tencel, you can put it directly in to soak. For all other cellulose fibers, I recommend handwashing and rinsing and maybe even a little time in boiling water before putting it into the soda ash presoak. Let the warp soak while you prep the rest of your dye setup.
Protect your work surface with one or two layers of plastic drop cloth and then set out your bowls. If you haven’t already, it’s time to mask up. Measure your dye powder according to the instructions (about 2 teaspoons of dye powder per cup of water or 4–8 teaspoons per cup for darker and more saturated colors). Start with the appropriate amount of dye powder in your bowl, add a tablespoon of water, mix into a paste, and then add a full cup of water and mix until the dye is evenly dissolved. Do this for all your colors.
From another drop cloth, cut out a piece of plastic big enough to fully wrap up a single warp chain and place it on your dyeing station. Remove one warp chain from the presoak tub, wring out most of the liquid, and then arrange the chain in the middle of the plastic piece. I usually arrange the chain in little neat rows from one end to the other. Don’t arrange the chain too tightly; give the yarn enough space for the dye to saturate thoroughly.
Finally, using the foam brushes, start applying the dye. Some artists apply the color carefully and meticulously, but that’s not me. I try not to overthink the color placement and just have fun—a little brown here, some gold there, maybe a bit of blue right there. Once the front of the chain looks fully covered in dye, flip the chain over carefully along the length and add dye anywhere the dye hasn’t penetrated, unless, of course, you want some undyed bits. Fold the edges of the plastic over to cover the chain completely. For the best color results, do not let the warp dry out. Set the chain somewhere it won’t be disturbed and repeat the process for the rest of your warp chains. Mix and match the colors used for each chain or keep it simple—it’s up to you.
After curing the chains for about 24 hours, glove up again, put your apron back on, and start rinsing out the dye. Give each chain a rinse in the sink to remove most of the excess dye and any remaining soda ash soak. Then add the chains to a pot of water and bring to a low boil, stirring while it heats up to make sure the hot water soaks through. Boil for a minute or two and take the chains back to the sink to rinse. The rinse water will run clean almost immediately. When you have rinsed all the chains, hang them to dry completely.

Samantha inlays pieces of thicker yarns in her sheds as she weaves for added textural interest.
I sett the shawl shown here at 24 ends per inch with a 30-inch width in the reed. One of my favorite drafts to work with is from Ralph E. Griswold’s Crackle Weaves collection (see Resources). It is an eight-shaft simple-yet-elegant draft perfect for a shawl or scarf, but there are many other draft choices—including plain weave—that work beautifully with painted warps. Before you begin warping your loom, decide if you want to keep your chains separate or blend them. Blending them gives a smoother transition but takes a little more time, while keeping them separate is straightforward but creates a blockier look.
Weave your scarf or shawl as you normally would. I use solid weft colors because they allow the dye work in the warp to remain the focus of the finished cloth. One of my favorite yarns to pair with 5/2 Tencel is Jagger Spun’s Super Lamb, a superwash wool. I have also had good luck with bamboo and silk.
And that’s it. Dyeing warps really isn’t hard; it just takes guts to get started, and once you do, you’ll be dyeing your own colorful warps.
Resources
dharmatrading.com/
greengrasshandwoven.com/
handweaving.net (draft #13451)
handwovenmagazine.com/safety-first-dyeing-safety-felicia-lo/
SAMANTHA HARING is a handweaver, textile artist, and photographer located in Cambridge, Minnesota. She weaves under the business name Handwoven Honey, and her work can be found on Instagram and Facebook @HandwovenHoney, or she can be contacted directly at [email protected].